lalala...
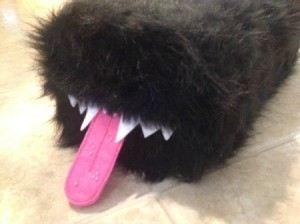
Gold Post Medal for All Time! 899 Posts  "Blocky" belongs to a friend of mine. Long story short, she used to use this block of wood behind the tire of a car she owned years ago. For whatever reason, she has moved it to each new car she has had, even though she doesn't need it anymore. I decided that if she was going to keep it, it needed a makeover!
Supplies:
- faux fur
- pink felt
- white felt
- pink embroidery floss
- sewing needle
- hot glue gun
- scissors
- googley eyes, optional
Steps:
- "Blocky" in his natural state.
- Lay the piece of wood on end, on the faux fur. Cut the fur, leaving about 1 inch of extra fur to glue to the sides. Apply hot glue, then glue the fur to the sides of the wood. Cut slits at the corners and trim away excess fur, then glue in place (see photo below).
- Trim the fur as short as possible, in the areas where it will be overlapped by the fur that will wrap around the middle.
- Create a tongue template, using cardstock. Attach the template to the felt with rolled pieces of tape. Cut out two (2) felt tongue pieces.
- Sew the tongue pieces together using embroidery floss and a backstitch. Leave the last inch of felt unstitched, as shown below. You can add taste buds and other details, if you choose. Note: The taste buds were created with french knots.
- Create a template for the teeth and cut them out of white felt.
- Cut two (2) pieces of fur that are slightly wider than the piece of wood and fold one edge over on each piece, gluing in place, to created a nice finished edge. These will create the opening of his mouth. Trim the fur short on the back side to make gluing on the teeth easier.
- Glue the teeth to the back of one of the mouth pieces.
- Glue the tongue to the end of the wood, as shown below.
- Glue the mouth piece, without the teeth, below the tongue. Then glue the mouth piece, with the teeth, above the tongue.
- Cut the fur from the mouth, leaving about 1 inch of material to glue to the sides. Glue the fur in place (see steps 2-3).
- Cut a piece of fur as wide as the piece of wood and slightly longer than is needed to wrap around it. Glue the fur to the wood lengthwise. Then begin wrapping the wood, gluing along the top and bottom edges.
- Once you have wrapped the wood and are back to the starting edge, cut off any excess fur and glue the other edge down. Fluff the fur along the edges, to disguise any seams.
- Glue googly eyes in place, if desired. I recommend trimming the fur short where you apply the glue, for better adhesion.

- Here is the new Blocky back in my friend's car, although he prefers to ride "shotgun"!
Add your voice! Click below to comment. ThriftyFun is powered by your wisdom!

Stella
Silver Post Medal for All Time! 254 Posts July 3, 20161 found this helpful
Very funny.

Marg
Gold Feedback Medal for All Time! 520 Feedbacks July 3, 20161 found this helpful
This is gorgeous!
Marg from England

July 4, 20161 found this helpful
You should get an A+++ for this adorable critter which is explained in such detail and with awesome photos. Some of us have talent but some of us enjoy seeing the talent of others :-)

attosa
Diamond Post Medal for All Time! 1,246 Posts July 1, 20190 found this helpful
Ohhh I love it!
Add your voice! Click below to comment. ThriftyFun is powered by your wisdom!

 "Blocky" belongs to a friend of mine. Long story short, she used to use this block of wood behind the tire of a car she owned years ago. For whatever reason, she has moved it to each new car she has had, even though she doesn't need it anymore. I decided that if she was going to keep it, it needed a makeover!