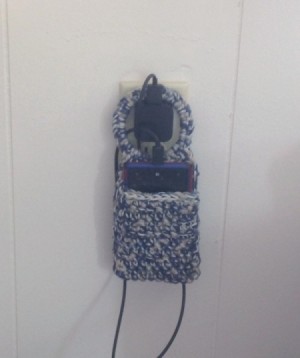
 With a plastic or wooden ring, like a bangle, you can make this to keep your charger and phone in one place.
Total Time: 1-2 hours
Yield: 1
Source: I saw this on Pinterest from Debbie Yorst and DIY Hooks and Yarns. Thanks Debbie! I modified it a bit for my own usage.
Supplies:
- 1 plastic ring about 2.5-3.0 inches in diameter ($.25)
- 1 size I hook ($0)
- 1 scissors ($0)
- 1 darning needle ($0)
Steps:
- Test your charger to make sure the ring is bigger. This is key. I used a single strand of yarn and a double strand of crochet thread, used to keep the yarn from stretching. I call this "Tharn".
- With the plastic ring, slip the hook inside and catch your cast on loop. Make a single crochet in the ring and continue till you have filled it. Mine was about 50. Yours might be less or more depending on the size of the ring.
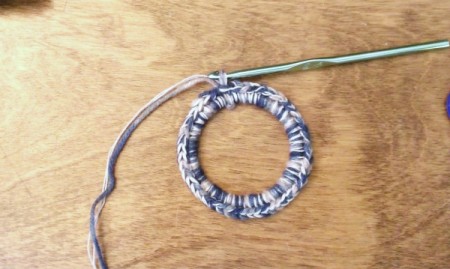
- When you have joined, chain 3 and make a double in the first stitch, a half double in the next, a single in the next two, a slip stitch in the next two, then reverse the order. You should have 12 stitches. The work will round a bit, but by the next row, it should even out. NOTE: Keep in mind the 12 count is for my phone. Make yours accordingly by leaving at least 2 stitches on either side of the cell so it will fit easily.
- For the next row, make a chain 2, half double, then singles across and make a half double in the last 2. From here on, it's singles back and forth till the length of the "pocket" is achieved.

- Continue on now until the cell you are making it for can fit. When you fold it up, it should expose the port where the charger goes into without fiddling with it. I left almost an inch so I can grab it quick.

- Leave an 8" or more tail to sew up the sides. Simply fold it over and sew down one side, weaving your needle and "Tharn" across the bottom to sew up the other side. Bind off the tails and tie them in the inside or the back.

- Use it to keep your charger and phone handy and always in the same place. N-JOY!

KS Granny
Bronze Feedback Medal for All Time! 111 Feedbacks July 5, 20170 found this helpful
I was misled by the phrase "reducing those frantic searches for either one." I never need to look for either one, as the charger is always plugged into the outlet and the phone is by my computer or other workspace. When I finished reading the instructions, still baffled, I went back to the original photo and studied it...and realized that the purpose is to keep the phone and charger tidy while you're charging it (as well as having a home base for the cell phone if you don't keep it by you all the time).
I sure could have used this when I was packing up my son's house when he was deployed to Afghanistan and decided to move before he came back - there was no flat surface near any outlet except a 2-inch-wide window sill! LOL
 With a plastic or wooden ring, like a bangle, you can make this to keep your charger and phone in one place.

