social

DIY Galvanized Roofing Raised Bed


Diamond Post Medal for All Time! 1,298 Posts
May 11, 2020

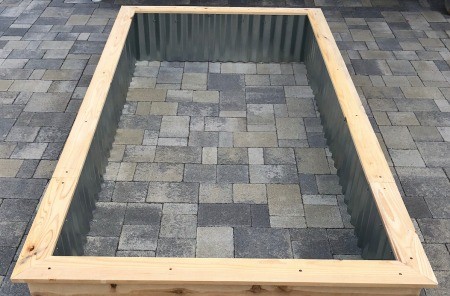
Galvanized Roofing Raised Bed - finished raised bed assembly on patioWith this pandemic, we would like to plant more vegetables and fruits in our backyard. We looked into pots and already made raised beds, but they were really expensive and not our dimensions.

Advertisement

Here is a tutorial on a galvanized raised bed we made. By using galvanized roofing material as the structure it will last much longer versus using wood.

*Note: These measurements work for us. You would have to calculate your own measurements.

Total supply cost: $70, but it could be cheaper if you use different wood/supplies. We went with cedar and galvanized screws so we can ensure this will last us a very long time!

Total Time: 1 day

Yield: 4 ft by 8 ft

Supplies:
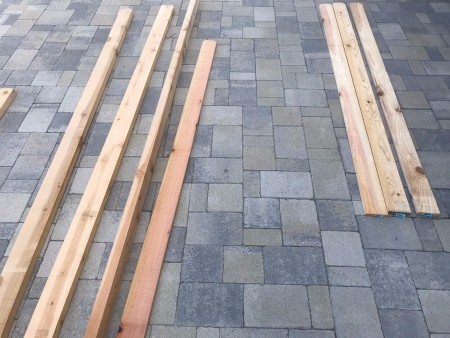
Galvanized Roofing Raised Bed - lengths of wood and fencing
 

Steps:

  1. With an angle grinder - cut the corrugated galvanized roof panel in increments of 12" for a total of 12 pieces.
  2. Galvanized Roofing Raised Bed - cut the galvanized panel to length
     
    Galvanized Roofing Raised Bed - panel on saw horsed
     
    Galvanized Roofing Raised Bed - panel with an angle grinder
     
    Advertisement

  3. Optional: You could cut each end at a 45 degree angle, but this is not necessary. My measurements are 8 ft long by 4 ft wide.
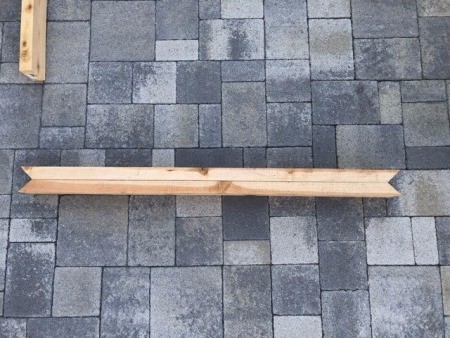
  4. Galvanized Roofing Raised Bed - lengths of wood fencing with 45% angle cut corners
     
  5. Assemble the frame with screws.
  6. Galvanized Roofing Raised Bed - closeup of ready to screw together corner
     
    Galvanized Roofing Raised Bed - three sides of the wooden frame complete
     
    Galvanized Roofing Raised Bed - corners screwed together
     
    Galvanized Roofing Raised Bed - wooden frame complete
     
  7. For a cheaper alternative, we went with 6 foot fence boards for the top border. We improvised by trimming off the fence tip and cutting to size.
  8. Galvanized Roofing Raised Bed - top boards being cut to fit
     
    Galvanized Roofing Raised Bed - top edge layout
     
    Galvanized Roofing Raised Bed - continuing to cut boards to fit
     
  9. Screw together the wood pieces to achieve the border.
  10. Galvanized Roofing Raised Bed - ready to assemble, closeup of angled corners
     
    Galvanized Roofing Raised Bed - small lengths cut and angled
     
    Galvanized Roofing Raised Bed - frame and top assembles
     
    Advertisement

  11. Flip the frame over and screw in the galvanized panel sheets all around.
  12. Galvanized Roofing Raised Bed - corrugated panels attached
     
Comment Pin it! Was this helpful? 4

Comments

Anonymous
May 12, 20200 found this helpful

These are fantastic. I have several and will have more as the year progresses.

Reply Was this helpful? Yes

Diamond Post Medal for All Time! 1,298 Posts
May 13, 20200 found this helpful

Thank you. I am working on another one. :)

Reply Was this helpful? Yes

Silver Post Medal for All Time! 254 Posts
May 14, 20200 found this helpful

These look great!

Reply Was this helpful? Yes

Diamond Post Medal for All Time! 1,298 Posts
May 16, 20200 found this helpful

Thank you kindly! :)

Reply Was this helpful? Yes
Read More Comments
Categories
Home and Garden Gardening Raised BedsJuly 15, 2020
Pages
More
🎃
Halloween Ideas!
🍂
Thanksgiving Ideas!
Facebook
Pinterest
YouTube
Instagram
Contests!
Newsletters
Ask a Question
Share a Post
Categories
Better LivingBudget & FinanceBusiness and LegalComputersConsumer AdviceCoronavirusCraftsEducationEntertainmentFood and RecipesHealth & BeautyHolidays and PartiesHome and GardenMake Your OwnOrganizingParentingPetsPhotosTravel and RecreationWeddings
Published by ThriftyFun.
Desktop Page | View Mobile
Disclaimer | Privacy Policy | Contact Us
Generated 2022-10-25 17:48:45 in 3 secs. ⛅️️
© 1997-2022 by Cumuli, Inc. All Rights Reserved.
https://www.thriftyfun.com/DIY-Galvanized-Roofing-Raised-Bed.html