social

How to Make a Fabric Chicken Doorstop


Gold Post Medal for All Time! 899 Posts
April 18, 2017

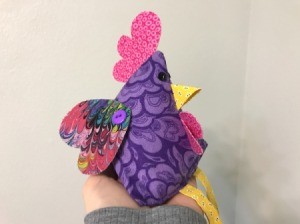
Fabric Chicken Doorstop - being held in palm of handI made this adorable chicken to use as a doorstop, but she would also be a great decoration for a chicken lover!

Advertisement

Supplies:

  • Downloadable Template (Click Here)
  • fabric for body (11" x 5" or bigger)
  • fabric for waddle and comb
  • fabric for beak and legs
  • fabric for wings
  • Wonder Under fusible web
  • buttons for eyes and wings
  • fiber stuffing
  • scissors
  • needle
  • thread
  • sewing machine
  • Optional Weighted Insert:
  • fabric for insert
  • rice
  • funnel, optional

Steps:

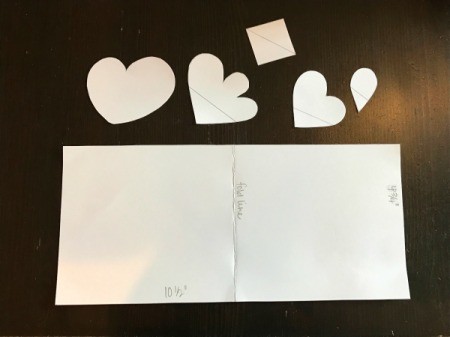
  1. Print the template pieces onto cardstock and cut them out.
  2. Fabric Chicken Doorstop - template pieces cut out
     
  3. Using rolled pieces of tape, stick the body template to the fabric and cut it out. Then use a ruler to measure in 1/4 in. and mark the seam lines all the way around the body, as shown below.
  4. Fabric Chicken Doorstop - trace body template onto fabric and cut out
     
    Fabric Chicken Doorstop - mark 1/4 inch seam with ruler
     
    Fabric Chicken Doorstop - fabric body piece with seam marked
     
  5. Trace the beak template onto the paper of the fusible webbing. Lay the webbing onto the wrong side of the fabric and adhere with an iron, following the package directions. Cut out the beak, remove the paper backing, and adhere it to another piece of fabric (on the wrong side) again, again following package directions. Now cut out the completed beak.
  6. Fabric Chicken Doorstop - trace beak template onto fusible webbing paper
     
    Fabric Chicken Doorstop - place webbing on wrong side of fabric
     
    Fabric Chicken Doorstop - iron on following package instructions
     
    Fabric Chicken Doorstop - cut out beak
     
    Fabric Chicken Doorstop - remove paper backing from webbing
     
    Fabric Chicken Doorstop - lay webbing side down on wrong side of beak fabric and press
     
    Fabric Chicken Doorstop - cut out finished beak
     
    Advertisement

  7. Repeat step 2 for the comb and waddle pieces.
  8. Fabric Chicken Doorstop - repeat step 2 for waddle and comb
     
    Fabric Chicken Doorstop - waddle and comb
     
    Fabric Chicken Doorstop - finished waddle and comb
     
  9. Repeat step 2 for the wings too.
  10. Fabric Chicken Doorstop - repeat step 2 for wings
     
    Fabric Chicken Doorstop - web side down on wrong side of wing fabric
     
    Fabric Chicken Doorstop - cut out finished wings
     
  11. Now place the beak, comb, and waddle onto the right side of the fabric as shown below. Pin them in place and pin the top seam of the body.
  12. Fabric Chicken Doorstop - arrange beak, waddle, and comb as shown in photo and pin in place
     
    Fabric Chicken Doorstop - pin top seam of body, right sides together
     
  13. Sew the top seam. Tie off thread ends. Fold the part of the comb that is in the way of the next seam out of the way. Then pin and sew the seam. Cut off parts that extend past the seams.
  14. Fabric Chicken Doorstop - sew top seam
     
    Fabric Chicken Doorstop - top seam sewn
     
    Fabric Chicken Doorstop - pin front seam
     
    Fabric Chicken Doorstop - pin comb out of way of front seam and sew seam
     
    Fabric Chicken Doorstop - trim off part of beak, comb, and waddle that extend past seam allowance
     
    Advertisement

  15. Turn the chicken right side out. Pin the wings in place and attach them by sewing on a button.
  16. Fabric Chicken Doorstop - turn chicken right side out
     
    Fabric Chicken Doorstop - wings placed and pinned
     
    Fabric Chicken Doorstop - sew wings on with a button
     
    Fabric Chicken Doorstop - side view of chicken with wing attached
     
  17. Sew the eyes in place.
  18. Fabric Chicken Doorstop - sew on eyes
     
    Fabric Chicken Doorstop - closeup of eye
     
  19. Cut out two pieces for the legs. Fold in half lengthwise, finger press at fold, then open it back up. Now fold each side into the center, finger pressing the folds.
  20. Fabric Chicken Doorstop - cut strips for legs
     
    Fabric Chicken Doorstop - fold in half lengthwise and finger press
     
    Fabric Chicken Doorstop - open out
     
    Fabric Chicken Doorstop - fold sides in toward the center fold line
     
    Fabric Chicken Doorstop - sides folded
     
  21. Bring both sides into the center, then fold in half at the center, as shown below. Pin and sew, tying off thread ends. Tie a knot at one end of each leg.
  22. Fabric Chicken Doorstop - fold sides into to center and fold in half along the center line
     
    Fabric Chicken Doorstop - pin legs along long side
     
    Fabric Chicken Doorstop - stitch leg close to edge
     
    Fabric Chicken Doorstop - tie thread and trim
     
    Fabric Chicken Doorstop - tie knot at one end of each leg
     
    Advertisement

  23. Cut out a piece of fabric for the insert that is 3 in x 6 in. Fold in half and sew along 3 edges, leaving an opening for turning. Snip off corners, then turn right side out.
  24. Fabric Chicken Doorstop - cut and sew insert leaving and opening for turning and filling
     
    Fabric Chicken Doorstop - clip corners
     
    Fabric Chicken Doorstop - turn right side out
     
  25. Fill the insert with rice, pin opening shut, and barrel stitch closed.
  26. Fabric Chicken Doorstop - use a funnel to fill the insert with rice
     
    Fabric Chicken Doorstop - filled insert
     
    Fabric Chicken Doorstop - turn in seam allowance and pin shut
     
    Fabric Chicken Doorstop - sew closed using a barrel stitch
     
    Fabric Chicken Doorstop - finished insert
     
  27. Pin the legs in place as shown below. Sew in place and tack out of the way with thread.
  28. Fabric Chicken Doorstop -pin legs in place as shown in photo
     
    Fabric Chicken Doorstop - baste and tack to body to keep them in place
     
    Advertisement

  29. Fill part way with fiber stuffing, then add the weighted insert. Add additional stuffing around the insert. Pin the body shut, turning the seam allowance in.
  30. Fabric Chicken Doorstop - add stuffing
     
    Fabric Chicken Doorstop - place insert on top of stuffing
     
    Fabric Chicken Doorstop - add more stuffing around insert
     
    Fabric Chicken Doorstop - pin closed turning in seam allowance and legs
     
  31. Sew the body shut using a barrel stitch, changing to a regular stitch at the legs.
  32. Fabric Chicken Doorstop - stitch closed using a barrel stitch up to legs, use a regular stitch, and return to barrel stitch on other side of legs
     
    Fabric Chicken Doorstop - closeup of sewing bottom shut
     
    Fabric Chicken Doorstop - chicken sitting on corner of shelf
     
  33. These make great doorstops or can be used as a decoration!
  34. Fabric Chicken Doorstop - being used as a doorstop
     
    Fabric Chicken Doorstop - sitting on top of room divider
     

Comments


Diamond Post Medal for All Time! 1,246 Posts
April 18, 20171 found this helpful

SOOOOOOOOOO
CUUUUUUUUTE!


Gold Post Medal for All Time! 969 Posts
April 20, 20170 found this helpful

This is adorable and the how to photos are epic! I made this for a scrap happy crocheted year long project.

Advertisement

I like yours better but now I am inspired to crocheted a new one to make for a door stop!!

 
April 20, 20170 found this helpful

Absolutely love this!
Was wondering if I might post this on my local Chicken FB page?


Silver Post Medal for All Time! 267 Posts
April 21, 20170 found this helpful

Feel free to share the post on Facebook or Pinterest or any other social media. We would love to see pictures if anyone makes one of these cute doorstops.

 
Read More Comments
In This Page
Categories
Crafts SewingMay 23, 2017
Pages
More
🌻
Gardening
🎆
Fourth of July Ideas!
👔
Father's Day Ideas!
Facebook
Pinterest
YouTube
Instagram
Categories
Better LivingBudget & FinanceBusiness and LegalComputersConsumer AdviceCoronavirusCraftsEducationEntertainmentFood and RecipesHealth & BeautyHolidays and PartiesHome and GardenMake Your OwnOrganizingParentingPetsPhotosTravel and RecreationWeddings
Published by ThriftyFun.
Desktop Page | View Mobile
Disclaimer | Privacy Policy | Contact Us
Generated 2024-06-09 01:50:09 in 7 secs. ⛅️️
© 1997-2024 by Cumuli, Inc. All Rights Reserved.
https://www.thriftyfun.com/Fabric-Chicken-Doorstop.html