lalala...
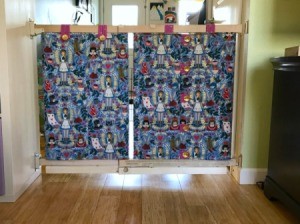
Gold Post Medal for All Time! 899 Posts  Our Chihuahua neurotically drinks water because of a psychological problem. Because of this, she will go to any lengths to get to the water bowl for our other dogs, which is on the other side of the baby gate. She would squeeze through it and under it. So to stop the constant hassle of her gorging on water, I made this fabric cover for the gate.
Supplies:
- Evenflo Top of Stairs Plus Gate (Affiliate Link)
- 2 yd canvas fabric
- 2 yd fabric, for lining
- 1/2 yd coordinating fabric, for button loops
- 14 buttons
- sewing machine
- sewing needles
- thread
- pins
- scissors
- embroidery floss, optional
- rubberized shelf liner
- Pool Noodle Inserts (Optional):
- 1-2 pool noodle(s)
- sharp knife
- Wooden Botton Extension (Optional):
- 1x2 strip of wood
- screws
- small washers
- saw
- sand paper
- drill
Related Product:
Steps:
- Measure around each of the two panels of the gate. Create a paper template. Pin the template to the fabric and cut out each panel. If you need to add the pool noodle inserts to close up gaps, make sure to attach the pool noodles before taking your measurements. (See step 14)
- Use the same template to create the liner panels. Cut out the liner panels. Then pin each liner panel to the decorative panels, right sides together.
- Create a paper template for the fabric button loops. Trace the template onto the wrong side of the fabric. Cut them out.
- Fold the loop piece in half lengthwise, use your finger to crease the fabric along the fold. Open up and fold each side into the middle, creasing both folds.
- Fold both sides into the middle, then fold in half again. Pin together as shown below.
- Sew along both sides of the fabric, close to the edge. Tie off threads and trim off excess.
- Create loops by bringing the ends next to each other. Pin the loops into the seam (as shown below) at equal intervals along the edge that will be buttoned together. Note: The loop part will be inside, between the panels, until it is sewn and turned right side out.
- Sew along the panel edges with a 1/4 seam, making sure to leave an opening for turning. Turn the panels right side out and finger press along the seams.
- Pin the opening shut and stitch closed.
- Sew a 1/4 inch top stitch all the way around each panel.
- Mark the button placements for each loop and sew the buttons in place. I used colorful embroidery floss to sew them on.
- I also added snaps at the top, bottom, and in between each button.
- I chose to stitch down the ends of each loop. This keeps the loops from stretching out and allowing the panel to loosen.
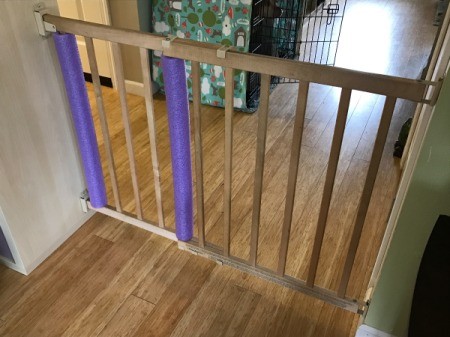
- Pool Noodle Inserts: Because our dog is small enough to squeeze through gaps in the gate at the ends and in the middle, we also had to add pool noodles to the end bars of the latch panel and ultimately the last bar of the hinge panel. Measure the length of the gate bar and cut the pool noodle to the proper length. Then cut along one side of the noodle lengthwise, so that you can slip it onto the bar. Be aware, the pool noodles will keep the gate from retracting.

- To keep the fabric panels from slipping down I wrapped the pool noodles and other bar of the hinge panel with shelf liner. I secured it with tape. Note: If you don't need to use pool noodles, then wrap the first and last bars of each panel with shelf liner.
- Test fit the panels on the gate.
- Top Straps: Create a new template for the button loops that is long enough to go around the button, as well as up and over the top of the gate. Follow steps 4-6 to create 4 longer loops. Determine where the buttons will be, mark their placement, and sew them onto the panels. Put the panels back onto the gate, hook the loops onto the buttons, and pin the ends in place on the other side. Remove the panels and sew the loops on. These top button loops will prevent the panels from sagging.
- Our dog could also squeeze under the gate so we added a wooden extension to the bottom. We cut 2 lengths of wood to the lengths of each panel. We marked screw locations that wouldn't interfere with the sliding brackets of the gate. We used small washers, stacked together, to elevate the wood above the brackets. Each piece of wood was attached at both ends and once in the middle.
Add your voice! Click below to comment. ThriftyFun is powered by your wisdom!

R Barbara
Bronze Post Medal for All Time! 190 Posts April 4, 20170 found this helpful
Love it; poor Nina foiled again.
Anonymous
April 5, 20170 found this helpful
I don't sew, but this looks easy enough to use iron on fabric glue instead of sewing :)

April 5, 20170 found this helpful
This is wonderful and very creative ;)
Add your voice! Click below to comment. ThriftyFun is powered by your wisdom!

 Our Chihuahua neurotically drinks water because of a psychological problem. Because of this, she will go to any lengths to get to the water bowl for our other dogs, which is on the other side of the baby gate. She would squeeze through it and under it. So to stop the constant hassle of her gorging on water, I made this fabric cover for the gate.