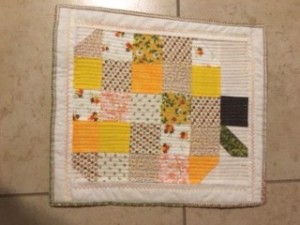
 A good way to use scraps. My daughter-in-law loves the fall season and pumpkins, so I made this for her.
Total Time: 4 hours
Yield: 1
Link: Fall Pumpkin Patchwork Table Tutorial
Supplies:
- fabric scraps
- batting
- backing fabric
- thread
- sewing machine
- pins
- scissors
- safety pins
- background fabric or muslin
Steps:
- Cut out twenty 3 inch squares from fabric scraps. Cut out one 3 inch square from brown for the stem. Cut out three 3 inch squares out of background fabric (I used muslin) for row one. Cut out four 2 1/2 inch background fabric squares for for the four "corners" of the pumpkin. Cut out one 3 inch square out of green fabric and one 1 1/2 inch square and one 2 1/2 inch square out of background fabric for the leaf.
- Doing the leaf first, sew the 1 1/2 inch background square to the green square drawing a diagonal seam at the lower right hand corner. Using the 2 1/2 inch background square, repeat, only sew to the upper left hand corner of the green square. Trim away from the seam line on both squares. Fold out and press.
- Lay out the patchwork squares into desired pattern, taking a picture with your cell phone for later reference. For the four "corners" of the pumpkin, using the first and last squares on row two and row six, draw diagonal lines and sew the 2 1/2 inch background squares on row two and row six as follows:
Row 2: upper left hand corner of first square and upper right hand corner of last square.
Row 6: lower left hand corner of a second square, lower right hand corner of the last square. This is the same procedure used for the leaf square only you are using only one square. Trim away excess and press. 
- Starting with the top row, sew two background squares, the brown square, the "leaf" square, and the remaining background square for a total of five squares across. Sew the remaining patchwork squares, five squares across, with your corner squares on row two and row six. When completed, press each row then sew the rows all together.
- Press the entire pumpkin. Add more background fabric strips to the top and sides of the pumpkin. The size of the background strips can be whatever size you want your finished table topper to be. Mine is for a smaller table, so the strips were about 3" wide.
- Safety pin the pumpkin to the batting with the backing fabric right sides together. Quilt by machine as desired. I sewed vertical stitches, l/4" apart all the way across the pumpkin. I also added a decorative machine stitch on the background strips using a variegated thread.
Bind the topper using your own method or using this simple method I found on youtube: https://www.youtube.com/watch?v=h9TKFsr1_Zs
Add your voice! Click below to comment. ThriftyFun is powered by your wisdom!

 A good way to use scraps. My daughter-in-law loves the fall season and pumpkins, so I made this for her.