social

How to Fold an Easy Origami Twirly-Copter

May 17, 2022

The finished origami twirly-copter.If you're looking for a fun and easy origami project, look no further than the origami twirly-copter! This project is perfect for kids of all ages, and it's a great way to teach them about geometry and aerodynamics. Plus, it's a lot of fun to fly!

Advertisement


Total Time: 5 minutes

Yield: 1

Link: The Daily Dabble

Supplies:

  • 1 square sheet of paper or origami paper
  • 1 Gluestick

Steps:

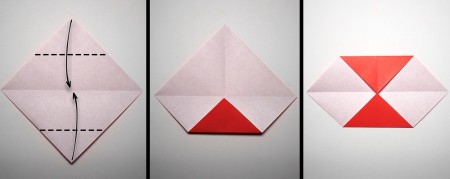
  1. Begin by rotating the paper so that you have a corner facing left and right, essentially making a diamond. Then fold the paper in half vertically by bringing the right corner over to the left corner. Crease well and then unfold.
  2. Folding a piece of origami paper.
     
  3. Next, fold the paper in half in the opposite direction by bringing the bottom corner to the top corner. Once again, crease well and unfold.
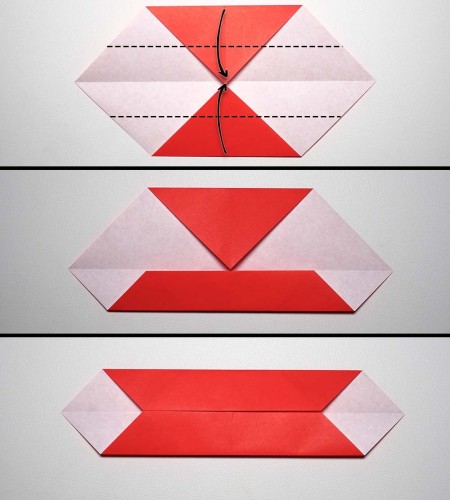
  4. Using the center line that we created in the previous step, fold the top and bottom edges to the center of the paper and crease.
  5. Folding a piece of origami paper.
     
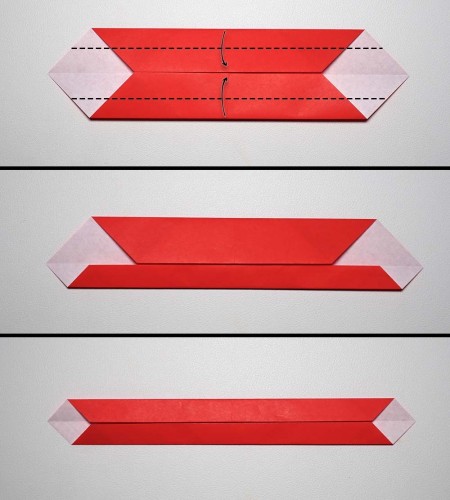
  6. Next, fold the top and bottom edges to the center crease. To avoid the paper from slipping inward as you fold, place your finger at the center to hold the flaps down.
  7. Folding a piece of origami paper.
     
    Advertisement

  8. Once again, take the top and bottom edges and fold them to the center. Take a moment here to flatten everything down nicely. Consider using a pen to fortify your creases.
  9. Folding a piece of origami paper.
     
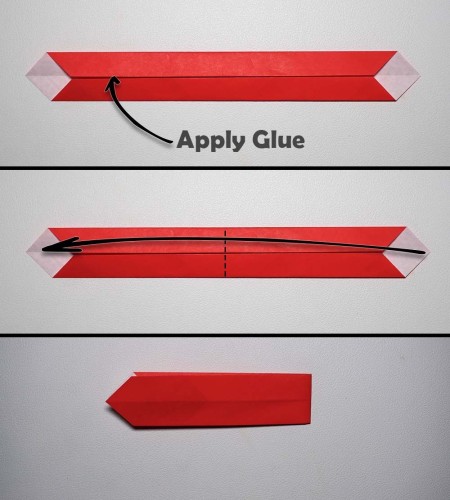
  10. Next, fold the paper in half, bringing the right section over to the left.
    At this point, you can either open it back up and apply some glue or use a small paperclip to hold it closed.
  11. Glueing a folded origami construction.
     
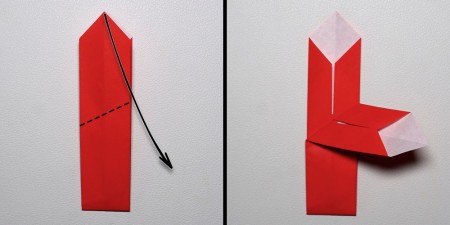
  12. To create the first wing, rotate your paper so that the pointed side is facing up (away from you). Then fold the top layer down and to the right---making your crease about halfway down the paper.
  13. Folding a piece of origami paper.
     
    Advertisement

  14. Flip the paper over and repeat the previous step on the other side to create the second blade. Try and fold the second blade to match the first as best you can. If they don't match, the helicopter will wobble or not work at all.
    Your twirly copter is now complete! Time for a test flight!
  15. Folding a piece of origami paper.
     
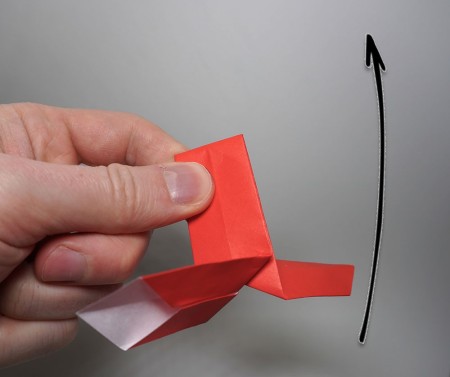
  16. Grab your paper copter by the base and throw it into the air base-side first. The weight of the base will flip the copter over mid-air and twirl its way safely to the ground!
  17. The finished origami twirly-copter.
     
Comment Pin it! Was this helpful? Yes
Categories
Crafts Paper OrigamiJune 30, 2022
Pages
More
🎃
Halloween Ideas!
🍂
Thanksgiving Ideas!
Facebook
Pinterest
YouTube
Instagram
Contests!
Newsletters
Ask a Question
Share a Post
Categories
Better LivingBudget & FinanceBusiness and LegalComputersConsumer AdviceCoronavirusCraftsEducationEntertainmentFood and RecipesHealth & BeautyHolidays and PartiesHome and GardenMake Your OwnOrganizingParentingPetsPhotosTravel and RecreationWeddings
Published by ThriftyFun.
Desktop Page | View Mobile
Disclaimer | Privacy Policy | Contact Us
Generated 2022-10-25 20:40:39 in 3 secs. ⛅️️
© 1997-2022 by Cumuli, Inc. All Rights Reserved.
https://www.thriftyfun.com/How-to-Fold-an-Easy-Origami-Twirly-Copter-1.html