social

Making Paper Pinwheels


Diamond Post Medal for All Time! 1,298 Posts
July 9, 2017

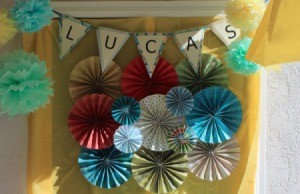
Pinwheel Wall Decor/Backdrop for Photos - pinwheel and pennant wall displayThis is an easy wall decoration or photo backdrop for special events like a baby shower, birthday, wedding, engagement, Mother's Day, Father's Day, or any party. You can change the paper to match the theme of your party too. I chose colorful scrapbook paper that I had on hand to make these.

Advertisement

Total Time: 10-15 minutes per pinwheel depending on the size

Supplies:

  • scrapbook paper
  • ruler
  • pen
  • glue
  • tape
  • scissors

Steps:

  1. As a demonstration, I will be making 6" pinwheels. You can apply this same concept with 12". Using your choice of 12 x 12 inch scrapbook paper, measure out 6" even squares and cut out.
  2. Pinwheel Wall Decor/Backdrop for Photos - 12 inch pieces of scrapbook paper
     
    Pinwheel Wall Decor/Backdrop for Photos - measuring to create 6 inch squares
     
    Pinwheel Wall Decor/Backdrop for Photos - cut into squares
     
  3. Fold accordion style into strips.
  4. Pinwheel Wall Decor/Backdrop for Photos - half way folded
     
    Pinwheel Wall Decor/Backdrop for Photos - view of back side of paper being folded
     
    Pinwheel Wall Decor/Backdrop for Photos - edge view of accordion fold
     
    Pinwheel Wall Decor/Backdrop for Photos - looking down on accordion fold
     
  5. Repeat two more times to have a total of 3 folded strips to assemble the pinwheel. You will need more for larger pinwheels.
  6. Pinwheel Wall Decor/Backdrop for Photos - slightly spread out folded paper, repeat 2 more times for a total of three
     
    Advertisement

  7. Now fold the pinwheel strips each in half.
  8. Pinwheel Wall Decor/Backdrop for Photos - folded paper strip
     
    Pinwheel Wall Decor/Backdrop for Photos - fold in half
     
    Pinwheel Wall Decor/Backdrop for Photos - folded half slightly open
     
  9. Repeat the fold for all 3.
  10. Pinwheel Wall Decor/Backdrop for Photos - fold the other two in half
     
  11. Time to glue or tape the seams together on each of the three fans.
  12. Pinwheel Wall Decor/Backdrop for Photos - tape seams
     
    Pinwheel Wall Decor/Backdrop for Photos - all three with center seam glued or taped
     
  13. Flip the fan over and tape the fan's seams all to each other.
  14. Pinwheel Wall Decor/Backdrop for Photos - flip sections over
     
    Pinwheel Wall Decor/Backdrop for Photos - tape all seams together
     
    Pinwheel Wall Decor/Backdrop for Photos - taped seam
     
    Advertisement

  15. Flip over and glue the insides together so nothing falls apart.
  16. Pinwheel Wall Decor/Backdrop for Photos
     
    Pinwheel Wall Decor/Backdrop for Photos - glue seams on right side of paper together
     
  17. Repeat the steps above until you have enough pinwheels for your decor or backdrop.
  18. Pinwheel Wall Decor/Backdrop for Photos - continue making as many pinwheels as you like
     
Read More Comments

4 More Solutions

This page contains the following solutions.


Silver Post Medal for All Time! 277 Posts
July 29, 2009

Kids will enjoy making and playing with these pinwheels. They are very quick, easy and inexpensive.

Red, white, and blue pinwheel.

Read More...

May 28, 2011

Whatever way you plan to celebrate the fourth of July, it's a really nice idea to make your own decorations to help your event go with a swing. With just some paints, paper, and a bit of imagination you can create some stunning star-spangled pinwheels.

Closeup of three finished pinwheels

Read More...

Questions

Here are the questions asked by community members. Read on to see the answers provided by the ThriftyFun community.

July 9, 2018

How do you make pinwheels?


Answers


Gold Post Medal for All Time! 677 Posts
July 9, 20180 found this helpful

You need a square of paper and pushpins. The instructions are here. m.wikihow.com/Make-a-Pinwheel


Diamond Post Medal for All Time! 1,246 Posts
July 10, 20180 found this helpful

Here is one I made from an aluminum can:

www.thriftyfun.com/Aluminum-Can-Pinwheel.html


Bronze Feedback Medal for All Time! 196 Feedbacks
July 11, 20180 found this helpful

These look super complicated, but are very easy and so pretty!!

www.youtube.com/watch?v=t5ovfSZPd5E

If you are working with kids, DO NOT USE the box cutter. That is overkill even if you are an adult. Plain old scissors work just fine :)

Advertisement

Have fun! Pinwheels are awesome!!


Gold Feedback Medal for All Time! 949 Feedbacks
July 12, 20180 found this helpful

Pinwheels are a fun project for young and "old".

  • Paper pinwheels are for indoors or just for fun outdoors.
  • You should look at all suggestions so you will have different ideas on designs. Instructions will be about the same for all paper pinwheels.
  • If this is for a children's project, it is always fun for children to draw and color their own designs - all you need is squares of white poster paper.
  • I have even seen small pinwheels made using a Popsicle stick (works better with 2 sticks glued together-thicker).
  • www.auntannie.com/.../
  • www.leslietryon.com/.../makepinwheel.html
  • Advertisement

  • Print instructions:
  • www.leslietryon.com/.../makeapinwheel.pdf
 

Bronze Post Medal for All Time! 107 Posts
July 12, 20180 found this helpful

I remember making them it was easy you just took a square of paper and cut into the paper at the corners, then folding alternating corners in to create the right shape and Bob's your uncle

 
Answer this Question

February 20, 2010

How do I make a paper pinwheel?

By barb

Answers


Bronze Feedback Medal for All Time! 147 Feedbacks
February 20, 20100 found this helpful

EasyInstructionsThings You'll Need:
8 1/2 x 11-inch piece of paper
Brass fastener
Drinking straw
Scissors
Crayons
Step 1Begin with an 8 1/2 x 11-inch sheet of paper. Construction paper is more durable, but it's not as lightweight as copy paper which can make it a little harder to spin.

Advertisement

Step 2
Make the paper into a square. Take one edge of the paper and fold it meet the top, so that you have a large triangle and a small rectangular strip of paper. Cut off the rectangular strip.

Step 3
Open up the folded square. There should be a crease in the middle. Fold the paper in half the other way so that when you open the square it has two creases making an "X." The square should essentially be divided into 4 triangles.

Step 4
Make a mark about 3/4 inch of the way up each line.

Step 5
Cut along each fold until you reach the mark. The paper will now have four distinct triangles attached to the center of the paper.

Step 6
Color or decorate each triangle.

Step 7
Take every other point and bring it to the center of the pinwheel. Try not to fold it on the way up, since a fold will interfere with the pinwheel's ability to spin. Fasten the points with a brass fastener, making sure to enlarge the hole enough that the pinwheel head can spin freely.

Step 8
Locate a spot on the straw about 1 to 2 inches from the top. Cut a small slit on either side in this space, taking care not to cut all the way through. Stick the pinwheel head onto the straw by sliding the brass fastener through the slits.

Step 9
Allow for a little space between the head of the pinwheel and the straw and then close the fastener. You may need to play around with it a little to get the pinwheel to spin with ease.
Go to -How do I make a paper pinwheel-for pictures.good luck.


Gold Post Medal for All Time! 846 Posts
March 1, 20100 found this helpful

I just read how to make these last week at Tip Nut :-) This link shows photo instructions, material list and a 'printable template' (the download for the template is in the material list area after the photo instructions) :-)

www.stylemepretty.com/.../

 
Answer this Question
Categories
Crafts ToysJanuary 3, 2013
Pages
More
🌻
Gardening
😎
Summer Ideas!
🎆
Fourth of July Ideas!
Facebook
Pinterest
YouTube
Instagram
Categories
Better LivingBudget & FinanceBusiness and LegalComputersConsumer AdviceCoronavirusCraftsEducationEntertainmentFood and RecipesHealth & BeautyHolidays and PartiesHome and GardenMake Your OwnOrganizingParentingPetsPhotosTravel and RecreationWeddings
Published by ThriftyFun.
Desktop Page | View Mobile
Disclaimer | Privacy Policy | Contact Us
Generated 2024-06-20 16:20:14 in 4 secs. ⛅️️
© 1997-2024 by Cumuli, Inc. All Rights Reserved.
https://www.thriftyfun.com/Making-Paper-Pinwheels.html