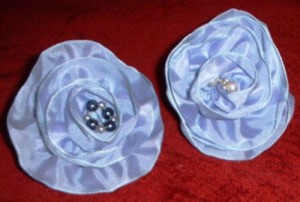
 One of the easiest and most inexpensive craft projects to add flair to your home or wardrobe is a simple ribbon rose. Ribbon roses can be made in any color and are perfect for adding elegance or fun as a brooch, pen top, or barrette. A ribbon rose can even add panache to guest towels or throw pillows.
You will need:
Optional material:
You will want to be sure:
Any children involved are supervised around hot glue and scissors
Your ribbon has wire down each edge and isn't too stiff.
Estimated cost for project as shown:
* materials purchased at a large craft retailer.
Estimated Project Time: 30-40 minutes
To begin, be sure you have all your materials assembled and a clean workspace. This makes any project a lot easier.
You could:
Affix a brooch pin or barrette form to the back of your rose with hot glue or sewing.
OR
Attach the rose to the top of a pen for a fun writing instrument.
OR
Sew a series of ribbon roses to a canvas bag for a great new spin on an old classic
To add embellishments (like a stamen made of seed pearls and silver balls as shown), is easy to do. Simply thread the beads of your choice to fine gauge silver wire and twist the wire tail. For a richer look, create several bead strands and wind them together. Once you have what you want, slide the tail through the middle of the blossom and twist the remaining wire around the ribbon 'stem'. Then, apply your floral wrap tape as per step 7.
Remember:
Optional embellishments:
Copyright 2005 ThriftyFun.com - About the author: Marnie McCown-Guard is a freelance writer/photographer. Her work has appeared in magazines, newspapers, the Internet and even on an audio CD.
Ask a QuestionHere are the questions asked by community members. Read on to see the answers provided by the ThriftyFun community or ask a new question.
I am thinking about making my own ribbon roses to use as my bridal bouquet. I have seen pictures of them and they look gorgeous. Only I haven't made them before and have just started practicing on some ribbon I found at home using online instructions.
There's another version of ribbon roses I've made before: (hope I remember right) If the ribbon is the same on both sides, hold onto the "tail", fold across the ribbon to make a point, then fold again and again, making more points. When you have about the size you want, loosen the outside and it should look like a blossom. Wire and tape the ends together at the bottom. It will look different from the wire ribbon rose.
ThriftyFun is one of the longest running frugal living communities on the Internet. These are archives of older discussions.
I wanted to know how to make roses out of ribbons. I want to make them from all of the ribbons on the flower sprays after a funeral.