Welcome to my Kitty World! I have 4 adult Siamese cats and we always have kittens. My husband Leo and I decided one day, we were going to go out and replace the scratching post that my husband made many years ago. Boy, were we in for sticker shock; we went to our local pet store and the prices were just outrageous. For a basic scratching post, we were looking at a minimum of about $60.00 and it was even ugly to look at.
When he built our last scratching post, he used carpet and it was hard, to say the least, to get it to wrap around the post. So we looked for alternatives to carpet and plans to build one on the internet. Well, there was not any plans that we could find that we liked so we decided to design our own. We found that a lot of the manufacturers were using fake fur now instead of carpet, to our relief, so we used that instead of carpet. Hey, and while we are at it, why not spoil our babies with something more than just a scratching post. My husband looked at many of the designs of pre-made cat trees and this is his version for the "Frick Kitties."
My husband's version could be made smaller or larger depending on what your needs are. Of course smaller would mean less money spent on materials. Try and Freecycle as much of the materials as you can. Lots of people have sheets of plywood left over from a project in their garage that they would love to get rid of and old fake fur coats can be used to cover the little houses and perches. A smaller version of this could be made by a novice woodworker, a little more skill is required for a larger one.
My husband suggests that all perches and boxes be made and covered with fake fur beforehand. Attach the rounds inside the tubes with wood glue. Nail or screw tubes onto the base with nails or screws at an angle. Cover the tubes with rope or door mat cut to size. You can also cover some of the tubes with fake fur. Next attach the L shaped piece of wood, screwing or nailing into the round piece of wood at the top of the tube. Nail or screw on your houses and perches.
Attach your kitty toys where you want them and cover the whole thing in catnip. We cut the black mat with a pair of shears. Once you got down to the base, it was not very thick and pretty easy to cut. For assembly, please refer to the picture. We found that we could cover most of the pieces with fabric beforehand and that helped greatly. It will take two people to wrap the jute around the posts as one person needs to be able to staple while the other person holds the jute tight.
I believe that my husband and I saved a great deal on making our own cat tree and we had a ball making it. The kitties love their new place to play and they use the scratcher made from the black mat a lot. I hope this gives everyone some great ideas. Depending on size, this could take a weekend to complete.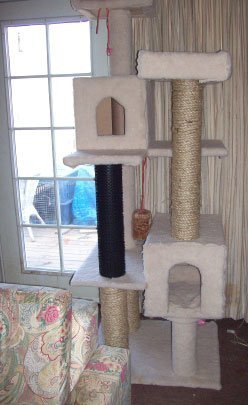
About The Author: Debra Frick is a mother of 5 and a grandmother to 7 grandsons. She is a published author and poetress. Born in California, she now lives in Colorado Springs with her husband and many pets. Her hobbies include crocheting, reading, arts and crafts and bargain hunting.
Add your voice! Click below to comment. ThriftyFun is powered by your wisdom!
To make it safe for the outdoors you can go to the fabric store and buy the outdoor upholstery fabric used to recover patio furniture or a nice heavy vinyl. Either would work great for out doors and would protect the wood. Also I would suggest using treated plywood. Hope that helps!
Let me suggest rubber back bathroom rugs instead of traditional carpeting! I used this on a cat tree that we built and it was amazing, it cut easily and formed around the curves nicely.
ive been looking for idea on making a cat tree for my spoiled Roscoe, and now I can show this to my hubby and brother-in-law and put them to work, boy are they going love me for this lol!! I love the way it looks
I love them! I finally found a floor to ceiling platforms only post for my two kitties, Nala an Abby/Tabby and Sarabi, a Seal Point. Sarabi loves it but I think the platforms are a little small for her big self (not too big, she's lost some weight since I switched her to a good quality food) so I need to make bigger platforms (she likes to "jump" and usually ends up flying all the way down!). I'll keep your plans so that we can expand on what we have.
Now...We've had Siamese in our family for generations (Traditional Applehead Siamese, not the "skinny real" ones) I got Sarabi a little over a year ago, my parents saw her and now my Mom wants one! (it took us 10 years to get over the death of Sibu our 18 1/2 yr old boy) She lives in the mountains in AZ and wants an inside Siamese, do you know of any rescue/contacts/breeders? I got mine for free from a family that breeds because the mom got out and go pregnant, Sarabi wasn't "show" quality so they decided to give the remaining kittens (7 mos) away before the new litter came. My mom doesn't want to pay an arm and a leg as she'd like to "rescue" one. I'd love any help I can get!
P.S. After finally finding Sarabi (I mean SHE picked me, I believe animals pick you) another Siamese (Choc. point) showed up on my doorstep, he was abused by men obviously and has some mangled teeth, but I feed him twice a day with moistened food, have a nice house my hubby built, so he's happy!
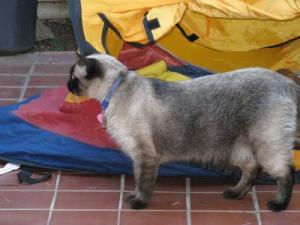
Thanks for the ideas! Sarabi is pictured here.
P.S.S. How come when I got Sarabi at 7 mo. she looked more Choc. point, but right around 12 months or so she's turned to more of a Seal coloring? Not that I mind, but I really miss that vanilla body of hers!
Great idea, much nicer and easier to adapt to available space and cat size.
Thank you so much!!!!! Our daughter has been wanting one so bad but I won't spend the $140 on the one she would like.
No kidding - the costs to get even a small cat tree are ridiculous! I have been in desperate need to have some climbing structures and scratching things for my cat because she's been using an old computer chair as her scratching post (and she knows that's "HER" chair to scratch on, we let her, she loves it, if she starts scratching on something else, we direct her to the chair and she finishes there, it's funny) but we really need to get something for her to jump on and scratch on, etc. Thanks for the instructions!!!
Does anyone have any instructions for making a free-standing cat tree for outdoors? It amazes me that the only ones sold are for indoors, when outdoor cats and indoor/outdoor cats would love to hang out on these on a patio or deck. We have 6 cats that go in and out, and one that refuses to come in. It makes me feel bad that the outdoor-only cat is without a cat-tree, while the indoor-outdoor kitties are always on theirs, sleeping, scratching, playing, climbing, washing, etc. I know she would adore one, too. :(
Thanks for posting this, was very help full, gave us great ideas!
Approximately what did all of the materials run you? The cat tree looks amazing and the prices in the store are outrageous! So this is definitely the option for us.
Thanks
All in all the huge cat condo/gym cost me about $350 in materials and took me most of 3 solid days to make it. It is completely self standing and the cats love it. I made it very sturdy and it took most of a 12' x 8' piece of carpet remnant.
Dave
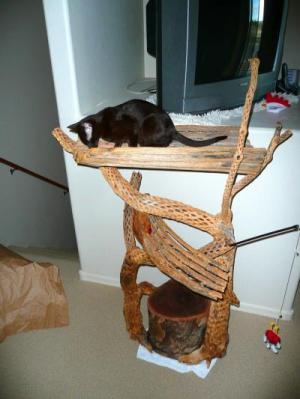
Here is a very simple outdoor cat tree. While this doesn't sit outside it is made for outside (Our Havana Browns are strictly indoor cats). The base is a cutoff piece of Mesquite stump. The rest is the skeletons from Cholla cactus and Sahuaro cactus. It is held together with decking screws.
Dave
Thank you very much for posting your experience in making the cat tree. We are planning on making one as well, as the one we purchased ($$$) was confiscated by another cat lover and we don't want to spend that kind of money on another. I think we can make a much nicer one for much less money! The tips on the carpet tube and the scratching mat are really great! Thanks again for sharing.
I have a plum tree we cut down and will cutit to fit inside the house for our two recued cats.We appreciate the ideas that have been posted and will use them to make our cat tree.Will sen pictures when it is finished.
I have manufactured cat furniture in the northeastern US for over 20 years. About 5 years ago, I decided to offer components for them - some finished - like wrapped sisal posts, and some raw materials - such as various lengths of bulk 3/8" Brazilian sisal rope . I started offering these products because I know that there are so many handy and capable people out there who prefer to create and execute their own designs. Because this is what I do every day, I have a natural respect for anyone willing to tackle such a project.
Your page on making cat trees is just fantastic, and I'll be referring the DIY'ers here for help. I don't provide this information on my own site (since I sell cat furniture there!). However, I HAVE written several articles for other web sites on the subject. If you want to send folks to see them, they'll find my advice if they Google these terms: "tips from a catman") or "tommy catman" or "flerper" . Most of this information is to help people avoid some common mistakes, and also to save them some time.
By the way, Dave's tree is really a work of art (as is his wife..lucky guy). I'd like to let people know about his plans if I can find them here.
To Connie W, who asked about making outdoor cat trees, I'd recommend that whatever she comes up with, don't put sisal rope anywhere it could get wet. Mold can develop on it.
Finally, anyone considering using MANILA rope as a substitute for sisal rope should think again. Manila is heavily oiled, and will stink up a home worse than a dirty litter box!
Very helpful and useful information here! It was interesting to read, and so nice to see this community helping each other out so generously.
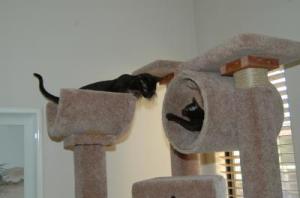
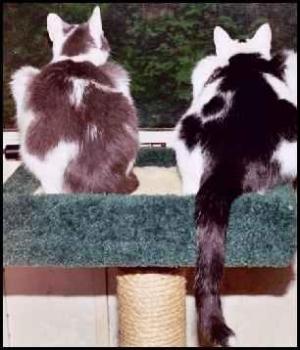
Best Regards, tommy catman & my "lab cats" Jasper and Gateway (shown in the photo).
I love this idea. It's awesome. I cannot afford to buy a cat tree at the store and I have 2 adults cats and a new kitten. My husband and I are going to make one. I will let everyone know how it turns out and how happy my kitties will be, Thanks for all the tips!
Thank you so much its very kind of you and your wife to share your idea's with every one.
my son and i will have fun as we have 1 cat 7 months and 3 new little one's 8 weeks. my rugs and lounge are coping it, so need some thing and the prices are out of this world $165 + we would love to get one but really don't have that kind of money. We did buy a small one single post my son left it out side and it rained well i found out what the cylinder was made of cardboard. which does not go well with water.lol.
I was shocked as I payed $35 for it. i thought it was plastic with carpet. So making it a better idea I am quite handy built my own bird aviary so I guess I should be able to do this. My son 9 is full of idea's a castle at least.lol. Once again thank you so much for your time and effort.
Regards, Lisa and jarred.
ps will post a picture of the end result.
Wow! Nice information! We just took in a stray kitten, and he's loving my older cat's scratching post. I was looking for how-to instructions and came across this. Thanks!
You guys are awesome. I had no idea what I was going to do, but I followed your instructions and made a huge cat tree! Thanks
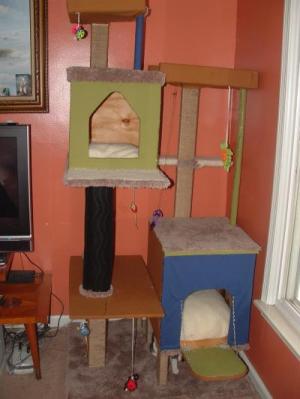
Thank you so much for sharing your plans! This was my first project so I had to invest in tools, but I was looking for a good excuse to buy tools anyway ;)
At first, I had a difficult time with this project because I wanted precision. I studied your photo and general directions for quite some time, because perfection was my goal. However, after a while, I got tired of being frustrated, and just put it together. It was fun! It isn't perfect - it's lopsided and leans a bit - but it's sturdy and my cats love it!
I don't think I'm going to add the second platform at the top, although I still have enough materials to do so. My cats seem to enjoy hanging off of the edges, so I didn't include the short walls on the platforms. I'll be adding toys next :)
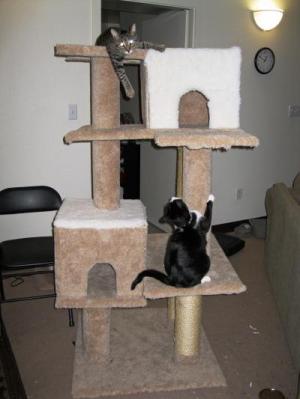
That looks nice. Great work. Don't think my hubby and I are that talented though!
Oh, and by the way, hi neighbor, I live in Colorado Springs, too !
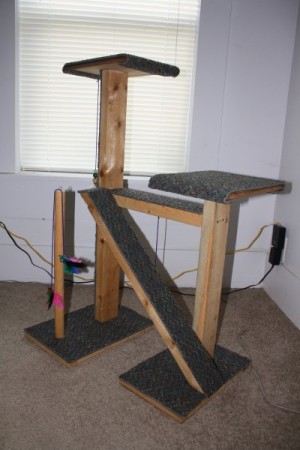
I made this cat tree/playhouse in about 3 hours with $0. Granted, I was able to have scrap wood and carpet laying around so that is what made the cost stay at $0. It is about 3.5 tall and about 2 .5 feet wide. A lot better than paying $140 for the one about the same size I saw in the store!
I have one quick question for the person who used tubes for his cats to lay instead of little houses. Where did you find tubes big enough?
Re: princesssteffy23
My guess would be that he used concrete form tubes, found at most home improvement stores in a variety of widths. They are great to use for DIY cat trees!
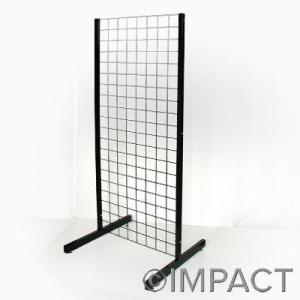
Use gridwall with legs to attach shelves to and make platforms for the cat with on them. Use two long brackets to make each self. Wire ties them to the brackets they can be moved anywhere on it, back and front. You could add plastic tubs with lids. Put holes in the top and the sides for the cats to use, put them on some of the platforms, and just carpet some. Take some lids off even. Endless possibilities.
I am taking the rope wrapped around things and the fake fur and I am going to tweak this to do a project of mine when I go though my scrap wood, I just love the idea and the ones sold at pet shops and that are online wont last as long, either. These are so beautiful, you should really make them and sell them.
Blessings, Robyn
Thanks for the information. We, too, looked at them in the pet stores and were amazed at what they were charging for them. This way you could make it to suit your home, since our's is small, we can't use one of the big wide ones but could make one to fit our room. Also, the fake fur is a great idea, our cat discovered our fake fur throw and loves sleeping on it now, so one of her own would help lol.
I made great cat scratching posts using heavy cast iron christmas tree stands I found at garage sales. I paid about $5 each for the stands and grab them up any time I see them. Mount in the stand a 4x4 wood post around 4 ft tall. Screw it in tightly with the tree screws. Wrap it with natural fiber rope securing the rope every few turns with large nail in staples. You can also screw on a resting platform on the top of the post made from plywood covered in carpet. Our many rescue cats love the scratching posts and they are cheap to make which is important to our limited budget with dozens of kitties to feed.
Add your voice! Click below to comment. ThriftyFun is powered by your wisdom!