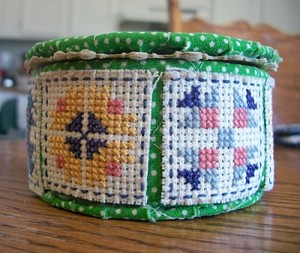
 This is a tuna can covered with a quilted fabric remnant and some left over cross-stitch mini squares, and a cardboard cloth covered lid.
Approximate Time: 60 minutes
Trace around the bottom of the tuna can, making a pattern for the lid. You'll cut one piece of cardboard that size for the lid and two pieces of cardboard for the bottom. Each piece for the bottom will hide the glued fabric edges to finish the project.
Cover the three cardboard pieces with tacky glue covered pre-quilted fabric. Make sure to cut your fabric large enough so it will cover one side of the cardboard. Carefully clip edges and fold down, gluing as you go. Hold with clothespins and allow to dry. Repeat for the inside cover for the bottom and the lid.
For the inside of the can, cut a piece of the pre-quilted fabric 5 inches wide and 12 inches long. This will be glued on to the side of the can and clipped slightly so you can glue part of it to the bottom to partially cover it.
When dry, glue the inside bottom piece in, then add the outside bottom piece to cover the bottom of the can to cover the clipped edges.
When dry, use tacky glue to add the tiny cross-stitched embellishments on the outside of the quilted fabric. Glue the small wooden bead to the lid and add to the tuna can.
I made several of these one year as last minute gifts. Instead of cross-stitched embellishments, you can add anything you might like to embellish it with.
By Monica from Cortez, CO
Share on ThriftyFunThis page contains the following solutions. Have something to add? Please share your solution!
This is a handy item to use for spare change, car keys, misc. items.