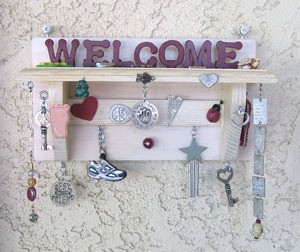
 For my welcome sign, I used things my family and I had collected over the years. I'm into beadwork and hearts, hubby is into running, my son is into reptiles and amphibians, and we're "all" into dogs! I attached the items to the sign with eye screws and nails.
I used a small, inexpensive "shelf" bought at a craft store ($2.99) for my sign, but any piece of wood could be used.
By Laura from Long Beach, CA
This page contains the following solutions.
I am big on nature. I took one long branch, a shorter branch, scrap wood, and made a welcome sign. I screwed the branches together. I put a screw(or nail) in top of the sign, wrapped copper wire around top screws.
Ding dong! Our dogs were going bonkers. We needed a "No Soliciting" sign quick! I didn't like the way the black store-bought ones looked, and I didn't want to spend money anyway.
Here are the questions asked by community members. Read on to see the answers provided by the ThriftyFun community.
Are there any web sites or can you give me ideas on how to make a "Welcome Friends" sign. Thanks.
By Mary from Traverse City, MI
Go to www.ask.com Ask for how to paint welcome signs on rocks. Very simple. gl
You can buy the wooden shaped block at Wally World or any craft store. You can also by small Balsa wood letters, rub on decorations (or scrapbook stickers work too), and liquid Polyurethane at the craft store.
Sand the whole thing to make sure there are no splinters &/or rough spots. Apply the letters with your favorite crafting glue. Next apply the rub ons (or scrapbook stickers) to your tastes. Finish by applying the Polyurethane. I usually apply 2 or 3 coats, depending on how shiny/rough I want it to look. Make sure to let each coat dry thoroughly before applying the next one.
I have lots of pictures of different signs I've found on the internet, if you would like to see them email me at: buddysbaby143 @ hotmail . com.
Hope this helps you! God Bless,
Sheila in Springfield, IL