social

Valentine's Day DIY Gift Bags


Diamond Post Medal for All Time! 1,298 Posts
January 24, 2019

Valentine's Day Decorated Gift BagYou can easily redesign a shopping bag into a Valentine's Day themed gift bag. You will need simple supplies that you probably already have at home!

Advertisement

Total Time: 20 minutes + drying time

Yield: 1 gift bag

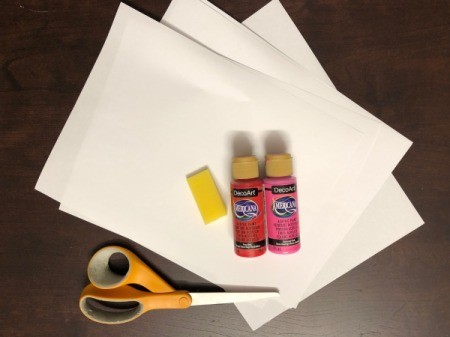
Supplies:

  • paper
  • scissors
  • acrylic paint
  • sponge
  • shopping bag
Valentine's Day Decorated Gift Bag - supplies
 

Steps:

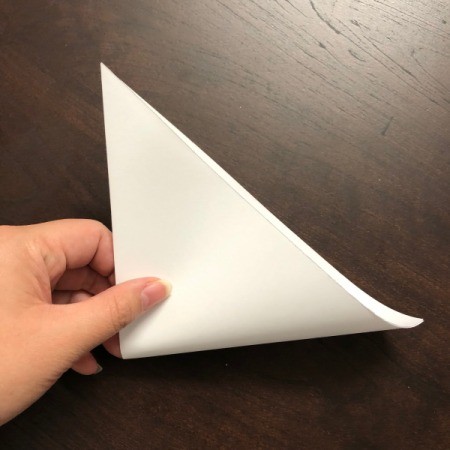
  1. To make your snowflake you will need a square sheet of paper. I used regular printer paper - folded over and cut like so.
  2. Valentine's Day Decorated Gift Bag - using white printer paper to make the snowflake, fold as shown
     
    Valentine's Day Decorated Gift Bag - cut off the excess
     
  3. Fold triangle in half.
  4. Valentine's Day Decorated Gift Bag - fold the triangle in half
     
  5. And in half again.
  6. Valentine's Day Decorated Gift Bag - and in half again
     
    Valentine's Day Decorated Gift Bag - after the second fold
     
  7. On creased side (in my photo on the left side) is where you will cut your design.
  8. Valentine's Day Decorated Gift Bag - cut the design on the folded left side in photo
     
    Valentine's Day Decorated Gift Bag - design beginning to be cut
     
    Valentine's Day Decorated Gift Bag - almost heart shaped lobes cut so far
     
    Valentine's Day Decorated Gift Bag - cut more designs
     
    Valentine's Day Decorated Gift Bag - cutting
     
    Advertisement

  9. Once you cut the design you like, reveal your awesome design! You can save the heart cutouts for another project too if you'd like.
  10. Valentine's Day Decorated Gift Bag - cut on the original folded area
     
    Valentine's Day Decorated Gift Bag - opened to reveal the design
     
    Valentine's Day Decorated Gift Bag - finished design with small heart cut outs next to it
     
  11. You can easily repeat the process and cut out other snowflake designs. The possibilities are endless.
  12. Valentine's Day Decorated Gift Bag - cutting a different design
     
    Valentine's Day Decorated Gift Bag - second design revealed when unfolded
     
  13. Use your choice of shopping bag, I used one from Chico's. I used red and pink acrylic paint and dabbed with a foam sponge.
  14. Valentine's Day Decorated Gift Bag - red and pink acrylic paint o a paper plate
     
    Valentine's Day Decorated Gift Bag - use a sponge to dab your paint onto the bag
     
    Valentine's Day Decorated Gift Bag - front of the bag covered with splotches of red paint
     
    Valentine's Day Decorated Gift Bag - pink paint added and allowed to dry
     
    Advertisement

  15. Allow to dry. Once dried you can glue the snowflake to your bag. Add a gift and the project is complete.
  16. Valentine's Day Decorated Gift Bag - paper heart snowflake and glue stick
     
    Valentine's Day Decorated Gift Bag - positioning the design on the front of the shopping bag
     
    Valentine's Day Decorated Gift Bag - design glued on
     
Comment Pin it! Was this helpful? 2

Comments


Diamond Post Medal for All Time! 1,246 Posts
January 24, 20190 found this helpful

Cute as can be! <3

Reply Was this helpful? Yes

Diamond Post Medal for All Time! 1,298 Posts
January 25, 20190 found this helpful

Thank you!!! :) I ended up making more.

Reply Was this helpful? Yes
Categories
Crafts Valentine's DayApril 25, 2019
Pages
More
🍂
Thanksgiving Ideas!
🎃
Halloween Ideas!
Facebook
Pinterest
YouTube
Instagram
Contests!
Newsletters
Ask a Question
Share a Post
Categories
Better LivingBudget & FinanceBusiness and LegalComputersConsumer AdviceCoronavirusCraftsEducationEntertainmentFood and RecipesHealth & BeautyHolidays and PartiesHome and GardenMake Your OwnOrganizingParentingPetsPhotosTravel and RecreationWeddings
Published by ThriftyFun.
Desktop Page | View Mobile
Disclaimer | Privacy Policy | Contact Us
Generated 2022-10-25 08:28:01 in 4 secs. ⛅️️
© 1997-2022 by Cumuli, Inc. All Rights Reserved.
https://www.thriftyfun.com/Valentines-Day-DIY-Gift-Bags.html