social

How to Make a Clothespin Apron


Gold Post Medal for All Time! 899 Posts
April 27, 2017

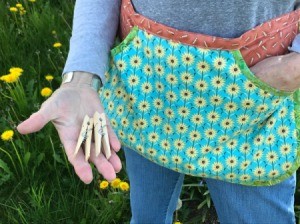
Clothespin Apron - person wearing the apron and holding a couple of clothes pinsMy mom recently purchased an amazing Breezecatcher revolving clothesline and decided that she really wanted to have a clothespin apron to use when hanging the wash. She found a style she liked online and we decided that we to make one using her choice of fabrics. This is how it turned out. She absolutely loves it! Click here to read a review for the Breezecatcher Rotary Clothesline.

Advertisement

Supplies:

  • template (cardstock, pencil, ruler)
  • fabric for apron
  • fabric for pocket
  • fabric for binding and ties
  • pins
  • scissors
  • needle
  • thread
  • sewing machine

Steps:

  1. Create a template on a piece of paper. The template is for both the main apron and the pouch pocket on the same piece of paper. Lay your hand on the template where you draw the pocket opening to be sure your hand will fit inside comfortably. Note: After cutting out the main apron pieces, you will trim the template for the pocket.
  2. Clothespin Apron - template for apron and pouch
     
    Clothespin Apron - drafting apron on brown craft paper
     
    Clothespin Apron - closeup of apron with seam allowance
     
    Clothespin Apron - pattern
     
    Clothespin Apron - check fitting hand for pouch depth
     
    Clothespin Apron - pouch lines on apron
     
    Clothespin Apron - brown paper pattern cut out
     
  3. Pin the apron template to the fabric, along the fold. Cut out two.
  4. Clothespin Apron - pattern placed on the fold of the apron fabric
     
    Clothespin Apron - paper pinned in place
     
    Clothespin Apron - closeup of pinned pattern
     
    Clothespin Apron - pattern with fabric cut out
     
    Clothespin Apron - opened two pieces of fabric for apron
     
  5. Now cut down the template for the pouch pocket.
  6. Clothespin Apron - removing portion of paper pattern to create pouch pattern
     
    Clothespin Apron - view of pouch paper pattern
     
    Advertisement

  7. Pin the template to the fabric along the fold. Cut out two.
  8. Clothespin Apron - pouch pattern pinned to flowered fabric
     
    Clothespin Apron = paper pattern still pinned to flowered fabric
     
    Clothespin Apron - cut out pouch fabric
     
  9. Bias Binding: Lay out the fabric, draw a line diagonally across (near the corner), then measure down 2 inches and draw another line across the fabric. Repeat until you have enough strips for the amount of binding you need. Then cut all of the strips.
  10. Clothespin Apron - drawing lines on green batik for bias binding
     
    Clothespin Apron - marking fabric for bias binding
     
    Clothespin Apron - lines drawn for bias binding
     
    Clothespin Apron - cutting bias binding
     
    Clothespin Apron - cut strips of bias binding
     
  11. Mark and cut off the diagonal ends of each strip.
  12. Clothespin Apron - marking the straight cut line on the end of the bias strips
     
    Clothespin Apron - bias strip squared off
     
    Advertisement

  13. Lay two strips together (right sides together) at a 90 degree angle, pin together, and then mark as shown below. Repeat until all strips are pinned together
  14. Clothespin Apron - bias strips pinned at right angles and then marking the stitch line
     
    Clothespin Apron - stitch line marked
     
    Clothespin Apron - pinned strips
     
  15. Sew along the marked line, trim off excess fabric, then iron each seam flat.
  16. Clothespin Apron - sewing the diagonal line on bias strips
     
    Clothespin Apron - view of diagonally sewn joint
     
    Clothespin Apron trim off extra seam allowance
     
    Clothespin Apron - seam seen from the right side
     
  17. Fold the binding in half and finger press. Then fold each side into the middle, finger pressing again.
  18. Clothespin Apron - finger press the seam along the center line
     
    Clothespin Apron - fold in the sides to the center
     
    Clothespin Apron - both sides folded in to the center
     
    Advertisement

  19. Lay your two pieces for the pouch wrong sides together. Open your bias binding up and pin right side to right side of the pouch. We also basted it in place. Sew on your machine.
  20. Clothespin Apron - pin the right side of the binding to the pocket opening
     
    Clothespin Apron - closeup of the binding pinned on
     
    Clothespin Apron - stitching the binding to the pocket edge
     
    Clothespin Apron - binding stitched on
     
  21. Trim off excess seam allowance and clip curves.
  22. Clothespin Apron - trim off excess seam allowance
     
    Clothespin Apron - clip curves
     
    Clothespin Apron - closeup of clips
     
  23. Fold the bias binding along the center fold back over the pouch pieces encasing the two layers. Adjust to fit and pin. Blind stitch along the inside.
  24. Clothespin Apron fold the binding over the seam and pin in place
     
    Clothespin Apron - cover the initial seam line when turning
     
    Clothespin Apron - seam line covered
     
    Clothespin Apron - binding turned and pinned in place
     
    Clothespin Apron - binging pinned in place on both pocket edges
     
    Clothespin Apron - inside edge of pocket
     
    Clothespin Apron - blind stitching the binding on the inside of pocket
     
    Advertisement

  25. Place the two layers of fabric for your main apron with wrong sides together. Lay the pouch on top. Pin along the top, through all 4 layers.
  26. Clothespin Apron - place the two apron fabric pieces together with wrong sides facing
     
    Clothespin Apron - lay and adjust the pouch so that edges match
     
    Clothespin Apron - close up of pouch edge
     
    Clothespin Apron - pin all four thicknesses along the long top edge
     
  27. We decided to make a fabric loop to hang the apron between uses. Cut a rectangle of fabric and fold in half. Finger press. Open out and fold both sides to the middle and finger press again. Now fold in half along the center fold and pin. Stitch very close to the folded edges. Make a loop and pin to the inside of the main apron piece, loop away from seam. Machine baste (with 1/4 in. seam) the four layers of the apron and pouch with the loop in place.
  28. Clothespin Apron - cut a narrow length of the batik to use in making a hanger, then fold in half and finger press along the center
     
    Clothespin Apron - fold the sides in to the center and then fold in half
     
    Clothespin Apron - pin along the entire length in preparation for sewing
     
    Clothespin Apron - stitch through all 4 thicknesses very close to the edge of the hanger
     
    Clothespin Apron - fold hanger in half and pin to the apron back with loop away from the seam
     
    Clothespin Apron - view of the loop machine basted in place
     
    Clothespin Apron - loop sticking up after machine basting of apron top
     
    Advertisement

  29. Pin the clothespin pouch to the apron layers around the outer edge. You can hand baste or leave pins in place and use them to also pin binding in place.
  30. Clothespin Apron - pin the apron together along sides and bottom
     
    Clothespin Apron - pouch pinned to apron
     
  31. Using the remainder of your bias binding, begin fitting to outer edge of apron again with right sides together. We decided to hand baste the seam as it was difficult to see the fold to use it as the stitching line. Once bias is pinned all of the way around sew on your machine.
  32. Clothespin Apron - bias binding pinned to apron by removing pins and resetting
     
    Clothespin Apron - measuring the seam allowance as it was difficult to see the fold
     
    Clothespin Apron - bias binding basted on
     
    Clothespin Apron - stitching binding
     
  33. Trim off excess seam allowance and clip curves. Fold binding to back side of apron and blind stitch in place. Press the binding once its all sewn on.
  34. Clothespin Apron - trim excess seam allowance
     
    Clothespin Apron - clip curves
     
    Clothespin Apron - fold bias binding to back of apron
     
    Clothespin Apron - blind stitch in place
     
    Clothespin Apron - press the apron and recently attached binding prior to attaching waistband
     
  35. Create a template that is 17" x 3" for the ties. One of the short sides of the template should be placed on a fold, so that your ties will be 35" long. Cut two ties.
  36. Clothespin Apron - pin apron tie patten on fold
     
    Clothespin Apron - cut out first tie and repeat
     
    Clothespin Apron - two ties
     
  37. Fold your tie template down to 10" x 3" and use it to cut out the waistband. Place the template on the fold, creating a waistband that is 20" long.
  38. Clothespin Apron - get your waistband pattern
     
    Clothespin Apron - pin waistband pattern on the fold and cut out
     
    Clothespin Apron - cut out waistband
     
  39. Pin ties to waistband, right sides together and stitch with 1/2 in. seam.
  40. Clothespin Apron - pin ties and waistband together with right sides together
     
    Clothespin Apron - stitch ties to waistband
     
    Clothespin Apron - tie and cut threads
     
    Clothespin Apron - seam can be finger pressed
     
  41. Hem the ties with a 1/2 in. seam, right sides together. Trim seam allowances and clip corners.
  42. Clothespin Apron - pin the ties together right sides facing
     
    Clothespin Apron - stitch ties, stopping short of the waistband
     
    Clothespin Apron - view of tie seam and turn to close ends
     
    Clothespin Apron - trim excess seam allowance
     
    Clothespin Apron - clip corner
     
    Clothespin Apron - trimming excess fabric on long seam
     
  43. Turn your ties right side out. We used a chopstick to assist in this step. Flatten along the seam and press.
  44. Clothespin Apron - turning the ties right side out
     
    Clothespin Apron - turned tie
     
    Clothespin Apron - press the ties
     
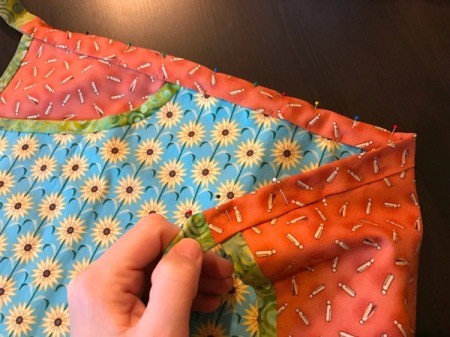
  45. Fold your waistband over the machine basting along the top edge and pin in place.
  46. Clothespin Apron - fold waistband to the back along the center and pin in place
     
  47. Begin top stitching on one tie and continue across waistband (this is actually also stitching it together over the apron top) and other tie. Turn at the end of tie and stitch up short end and turn again to continue top stitching across back to first tie. Close top stitching by turning and connecting to initial stitches.
  48. Clothespin Apron - begin topstitching on ties close to edge
     
    Clothespin Apron - continue topstitching to also include attaching the waistband
     
    Clothespin Apron - continue around complete length of both ties and turn to stitch top, ends, and bottom
     
    Clothespin Apron - topstitching across the waistband
     
  49. It is done. See the front and back views below.
  50. Clothespin Apron - finished apron front
     
    Clothespin Apron - view of finished apron from the back
     
  51. Tie it on and hang some laundry. The spacious pouch holds lots of pins.
  52. Clothespin Apron - Mom wearing the clothespin apron
     
    Clothespin Apron - hanging Peanuts sheets
     
    Clothespin Apron - closeup of pins in pouch
     
Comment Pin it! Was this helpful? 7

Comments


Silver Post Medal for All Time! 418 Posts
April 29, 20170 found this helpful

A long time ago, I had an apron clothespin bag made like that and I loved it.

I miss my clothesline. A Breezecatcher would be perfect for me. I think I will start hinting around and see what happens. With Mothers Day and my birthday coming up, maybe something will happen.

Reply Was this helpful? Yes

Diamond Post Medal for All Time! 1,246 Posts
April 30, 20170 found this helpful

It's beautiful! I'll work on one of these with my mum :)

Reply Was this helpful? Yes

Bronze Answer Medal for All Time! 242 Answers
May 22, 20170 found this helpful

This is a very neat idea!! This is a must try! & I'm going to try it! I just love hanging my clothes out, but always have an issue of how to keep my pins handy. This would save me time & pain from bending down too!

Reply Was this helpful? Yes
June 7, 20190 found this helpful

This pattern and tutorial are amazing! Thank you so much for sharing.

Reply Was this helpful? Yes
Read More Comments
Categories
Crafts SewingJune 17, 2017
Pages
More
🎃
Halloween Ideas!
🍂
Thanksgiving Ideas!
Facebook
Pinterest
YouTube
Instagram
Contests!
Newsletters
Ask a Question
Share a Post
Categories
Better LivingBudget & FinanceBusiness and LegalComputersConsumer AdviceCoronavirusCraftsEducationEntertainmentFood and RecipesHealth & BeautyHolidays and PartiesHome and GardenMake Your OwnOrganizingParentingPetsPhotosTravel and RecreationWeddings
Published by ThriftyFun.
Desktop Page | View Mobile
Disclaimer | Privacy Policy | Contact Us
Generated 2022-10-24 09:10:33 in 9 secs. ⛅️️
© 1997-2022 by Cumuli, Inc. All Rights Reserved.
https://www.thriftyfun.com/How-to-Make-a-Clothespin-Apron.html