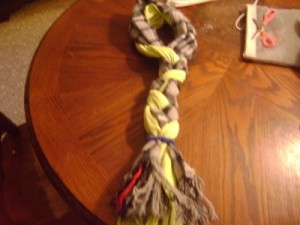
I have found that by braiding two winter scarves together seperating them into three ends hanging down (it will be uneven but no one will notice), that it is much warmer. I secured it with a fancy hair elastic. Even just a rubber band would do.
I have a bunch of winter scarves that seem more to be for decoration than for warmth, since they are so thin. I got tired of no one using them so I braided them for myself. I left the opening big enough to take off over my head without unbraiding it. I hang it on the wall and it is all ready for when I go out.
The first time I wore it I got lots of compliments.
By Robyn from Tennessee
Add your voice! Click below to comment. ThriftyFun is powered by your wisdom!
I'm not sure I understand how you can braid 2 scarves and get 3 ends. I guess I need a picture.
I agree with lighthouselady. How do you braid 2 scarves, end up with 3 ends, and leave scarf braided to pull over your head? Pictures please, and maybe braiding directions.
Sounds very neat - would you add a picture, I would love to see it!
Okay; let's see if I got it: Drape one scarf around neck with 2 ends hanging down; fold the 2nd scarf in half, at just below neckline (leave enough room to slip off over head when finished); slip each end of first scarf through fold of 2nd in opposite directions; braid, using both ends of folded scarf as 3rd braid. Or, drape both scarves around neck (maybe twisting together just the around-the-neck portion), which leaves 4 ends hanging down.
Thank you for your comments, and yes I will add a picture. I put the two scarves ON me and then I braided them.
I did not braid them off of me. I wanted to leave a big enough hole in it to get it off my head when I was through.
I will also add a video but before you watch the video, I want to try to explain how to braid.
How to Braid:
Step One: Get the what you are going to braid into three separate parts.
Step Two: Separate them a little so they don't get mixed up. This is ninety percent of the braiding, just separating them.
Step Three: There will always be a center strand.
Step Four: Cross one part over the center. This will create an upside down V.
Step Five: Put the one on the opposite side in the middle of the upside down V.
Step Six: Keep taking turns putting each side part in the middle of the upside down V.
Each time you cross over a strand it will make a new middle. You never really touch the middle once it is in the middle but use the one on either side of it to cross over. That will each time make a new middle.
Step Ten: Tie off the end of the braid.
Another way to put it...make two of the strings do the splits and cross the other string between them. Keep changing which ones do the splits.
If you can't get it just yet, don't worry, I am still trying to learn how to do my hair in a french braid.
Here is a video of braiding hair.
www.ehow.com/

Hiya Robyn, and Happy Thanksgiving from an American in Scotland:)
I love this tip and will definitely be using it here in cold-cold-cold Scotland! My idea of a shopping spree is a tenner (=$15.91 at current exchange) browse through the charity shops (Salvation Army, British Red Cross, Cancer Foundation, etc) and scarves perfect for braiding are a wonderful bargain, usually costing no more that £1.50 or £2. ($2.39 to $3.18)
Thank-you for posting this (and the great instructions:). Have a beautiful and peaceful holiday season!
Add your voice! Click below to comment. ThriftyFun is powered by your wisdom!