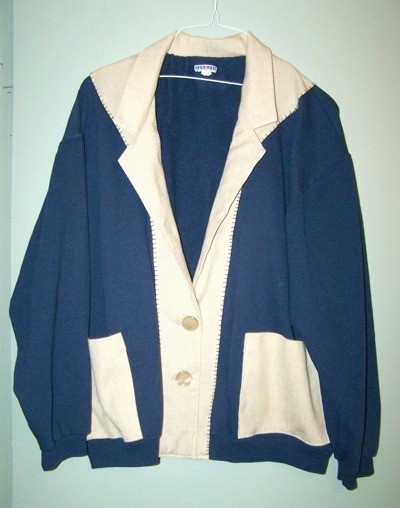
Have a sweatshirt that is stained or worn out on the front, but the rest is in good shape? How about a jacket that you are tired of or is out of style, but you can't bare to part with? Here is a way to save them and make a "Jacketshirt"! This is a project for an intermediate sewer at least.
Approximate Time:
Lay your sweatshirt out flat making sure to match the seams; slit the front from top to bottom. Be sure you don't cut the back. Cut the collar off being very careful to cut as close as you can to the collar itself and discard. See illustration E.This is the only part of the sweatshirt you will be cutting unless you decide to use the hem of the jacket and cut off the hem of the sweatshirt.
Remove the shoulder pads from the jacket and the pockets, be careful not to cut any holes removing the buttons and pockets. Keep them both as you may want to re-attach them to your finished jacket as I did.
Slip your sweatshirt on your dress form, model, or a padded hanger then put the jacket on over the top. Match the shoulder seams and pin in place. Pin down the side seams and around the bottom hem at the level of which ever is shorter for now.
Smooth the fronts together from the side seams to the center front and pin together. Now is the time you have to decide your design. You can refer to my illustrations for some ideas, but please feel free to design your own. You have a clean pallet to play with. You will be cutting away the parts of each where you don't want them to show except under the lapels. There I lined the sweatshirt up with the front center edge of the jacket and topstitched to hold it in place. When it came to the button holes I slit the sweatshirt and pushed the edges around them with a seam ripper.
Look at the different illustrations to get some design ideas of how you can cut the jacket to attach to the sweatshirt. These are only ideas for you, feel free to design your own. I am rather hippy, so I tend to stay away from horizontal designs, but if you are narrow at the hip you may want to consider design E. Just remember you are going to be sewing the edges of the jacket to the sweatshirt. The important thing is that you must leave the lapels, lining of, and collar of the jacket in tact.
The shaded areas on my illustrations are where I left the sweatshirt and the light areas are the jacket fabric. To make the diamonds in the back of version E; make a diamond template 1/8 inch smaller than you want the finished hole. Trace it on the jacket where you want them, cut on the lines and make a 1/8 inch slit at the points so you can turn the edges under leaving the sweatshirt showing; press the edges back between these slits being careful not to stretch them as they will be on the diagonal. Run a running stitch along the edges to hold them until you are ready to topstitch them down to the sweatshirt; making sure to take several tight small stitches in the points. I suggest making a paper pattern design for one side of the back, pinning it on the jacket and trimming it down a little at a time until you are happy with it then lay it on another piece of paper and copy so you have an exact match. You can't do this for the front because one side of the lapel is wider than the other unless you keep your jacket buttoned shut; just make sure to take this into account when making your pattern.
Okay you are ready to start sewing. Pin, pin, pin that is the secret otherwise the sweatshirt will stretch. Pin your two layers together all the way around and try it on your dress form or model to make sure it lays smooth; now is your last chance to make adjustments.
Now you have your pattern all designed onto paper and transferred to your jacket so all you have to do is fold the edges of your jacket under 1/4 inch and sew your jacket to the sweatshirt base. You will sew the neck of the sweatshirt between the collar facing and the back of the jacket so pin it as tight to the seam as you can.
Once you have pinned all the way around the jacket edges, start your stitching at the front on the side that the buttons go on. On the wrong side of the jacket top stitch 1/4 inch from the first line of top stitching to guarantee you are catching the sweatshirt. When you come to the collar make sure your facing is laying flat and stay 1/4 inch from the seam again to assure catching the sweatshirt.
Attach your buttons and pockets as you want and you have a “Jackshirt”!
By Ann (latrtatr) from Loup City, NE

Add your voice! Click below to comment. ThriftyFun is powered by your wisdom!
I love this idea! I'm always recycling garments, too, so I'll remember to save parts for making one of these when cleaning out the closet. I'd never thought of cutting apart a jacket to add to a sweatshirt, very cool pattern. Thanks so much for sharing!
Add your voice! Click below to comment. ThriftyFun is powered by your wisdom!