social

How to Make a Gourd Birdhouse


Gold Post Medal for All Time! 858 Posts

Gourds are fun and easy to grow, and many of the hard-shell types make wonderful houses for common cavity-nesting bird species like chickadees, nuthatches, and martins. Here are some tips on how to grow gourds, cure them, and turn them into cozy homes for your feathered friends.

Advertisement

The Best Gourds for Birdhouses:

The most common types of gourds used for making birdhouses are bottle gourds. In catalogs and garden centers the seeds are often labeled and sold as "Mexican bottle gourds", or "birdhouse" gourds. Other gourds make good birdhouses, too, including: Dipper gourds, Maranka gourds, Penguin gourds, and Kettle gourds. Ideally, the variety you choose should have a bulbous base that is at least 8 to 10 inches in diameter and a neck or stem long enough to attach a wire for hanging.

Growing Gourds:

If you have the room (vines can reach 100 feet in a single season), birdhouse gourds are pretty simple to grow. All they really need is a lot of sun, a lot of water, and a good long stretch (150-180 days) of warm weather. If you live in a cooler climate with a shorter growing season, start seeds early indoors. It's wise to place your seed order in the fall for the following season as supplies of these popular seeds can run short once spring rolls around.

Advertisement

Here is some general information on their growing requirements:

http://www.thriftyfun.com/tf13415917.tip.html

If you don't have the time or room to grow gourds, you can always buy them and do the curing and finishing yourself. Look for them in the fall at nurseries, garden centers, farmer's markets, and crafts stores - the same places you find decorative gourds and pumpkins for sale.

The Curing Process:To cure your gourds, cut them from the vine once they fully mature (turn from green to tan). Store them in a warm location with good air circulation and leave them to dry (up to several months). Don't worry if during the process you see some shriveling and a few small spots appear. This is perfectly normal. When the gourd is completely dry the seeds inside will rattle when you shake it.

Advertisement

Now you can clean the outer surface with a wire brush or sandpaper. After cleaning the outer surface, soak the gourd for 10-15 minutes in a bleach solution (1 part bleach, 10 parts water) to help further protect it from rot and mold. Remove it from the solution and allow it to completely dry before working it into a birdhouse.

Making Birdhouses

Materials:

  • disposable dust mask and a pair of gloves to wear while working with dried gourds (This may seem like overkill, but please don't skip this step. Many people have allergic reactions to gourd dust. Better safe than sorry!).
  • pencil or pen to mark size and location of entry hole
  • drill with 1/8 inch drill bit
  • keyhole saw or small hand saw designed to make accurate cuts
  • fork or spoon for scraping and removing the insides of the gourd
  • 1 fully dried/cured gourd, 8 to 10 inches in diameter
  • flexible wire (galvanized or plastic-coated) for hanging
Advertisement

Steps for creating your birdhouse:

  1. Create the entry hole: To thwart would-be predators, different bird species have very specific preferences as to the size of the entry holes to their nests. Determine what type of species you would like to attract with your birdhouse, then use this chart to locate the appropriate entry size (and the height their nest is from the ground).

    http://www.wild-bird-watching.com/Building_Bird_Houses.html

  2. Once you've determined the appropriate size, draw a circle just above the widest part of the gourd to mark the location of the entry hole.
  3. Drill 3 or 4 small holes around the circle, 1/4 inch apart, to get the hole started.
  4. Once you have the holes drilled, use the keyhole saw to enlarge the hold to the proper size.
  5. Don't worry about adding a perch. Perches enable access by predators and most birds prefer to go without them.
  6. Add drainage holes: Turn the gourd over and make 3 small holes in the bottom. These holes will enable drainage and allow for air circulation. Depending on the size of the gourd, you may also want to add 2-3 additional "vent" holes along the bottom sides to help with air circulation.
  7. Advertisement

  8. Attach wire for hanging: Drill 2 small holes on either side of the stem or neck, 1 - 1 1/2 inches from the top. Run your wire through the holes to create a hanger. To create a nest with less "swing" in the wind, try using a wire clothes hanger instead of flexible wire.
  9. Hollow out the inside: Once your drainage holes are drilled and you have attached wire for hanging, use a fork or spoon to scrape the inside of the gourd clean.
  10. Weather-proof the exterior: To protect your birdhouse from the elements and extend its lifespan, weatherproof the exterior (not the interior!) with 2-3 coats of clean polyurethane. If you prefer a more colorful look, skip the polyurethane and use enamel paint over an oil-based primer instead. Just be sure to stick with lighter colors. Dark paint absorbs heat and may cause the birdhouse to overheat in the summer.
  11. Advertisement

  12. Hang your birdhouse and enjoy your new neighbors!

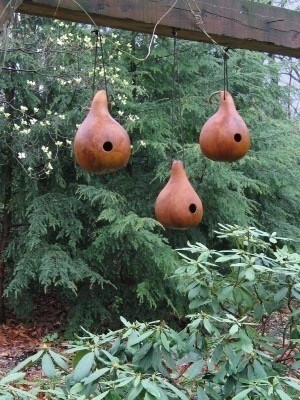
Birdhouse made from gourds.
 

Add your voice! Click below to comment. ThriftyFun is powered by your wisdom!

 
June 25, 20130 found this helpful

When I make the drainage and vent holes, what size drill bit do I use? Thanks Jeanne


Bronze Feedback Medal for All Time! 131 Feedbacks
May 17, 20220 found this helpful

We have a couple of Black Redstart that comes every year and nest in the dustbin location. They have made 4 nests in there and they never use the same nest twice in a row. We clean the oldest nests, that is, we pick up the moss and most of the dirtiest branches that make the structure of the nest and we clean the pipes with just water. Every year they pick up new little branches from the tree and new moss also from the bark of the trees but they also use some parts of the old nests. This bird usually has 3 broods per season but has only one in our place. For the rest of the season we see them coming to get food in our yard at the same rythme as when they feed the new birds. Last year they used a nest in the dustbin location and then a nest in a tree nearby. Knowing this and imagining that they are not the only birds with this need of having a new nest I wonder how you manage to clean the birdhouse. The Black Redstart that come to our house every year are very territorial. There is never a third bird male of female that comes around so I would like to know if you already had different species living next to each other in the birdhouses or couples of the same species and which ones. I would like to put birdhouses around but I know our black and red tails tenants will not admit it.


Add your voice! Click below to comment. ThriftyFun is powered by your wisdom!

 
In This Page
Categories
Home and Garden Gardening Birds & Bird HousesNovember 2, 2010
Pages
More
💘
Valentine's Ideas!
🎂
Birthday Ideas!
🍀
St. Patrick's Ideas!
Facebook
Pinterest
YouTube
Instagram
Categories
Better LivingBudget & FinanceBusiness and LegalComputersConsumer AdviceCoronavirusCraftsEducationEntertainmentFood and RecipesHealth & BeautyHolidays and PartiesHome and GardenMake Your OwnOrganizingParentingPetsPhotosTravel and RecreationWeddings
Published by ThriftyFun.
Desktop Page | View Mobile
Disclaimer | Privacy Policy | Contact Us
Generated 2024-01-28 18:39:26 in 2 secs. ⛅️️
© 1997-2024 by Cumuli, Inc. All Rights Reserved.
https://www.thriftyfun.com/tf25456446.tip.html