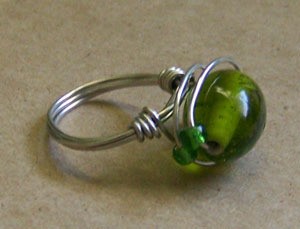
Description:
This fashionable cocktail ring is easy to make and
looks great too. Your friends will all want one.
Tip:
Be creative by using vintage beads and whimsical adornments. Try coordinating or clashing colours depending on your taste and the seasons popular colours.
Approx. Time to Complete:
30 - 60 minutes
List of Materials:
- one 1/2 inch glass bead
- three glass seed beads
- thirty inches of 24 gauge silver or gold jewelry making wire
- jewelry making 3-in-one tool or wire cutters and round nosed pliers
- a marker of same diameter as your finger
(I like to make rings for my middle finger and have found a marker of the same diameter)
Step-by-Step Instructions:
Lay out:
Decide upon an attractive bead to use as the focal point. Also choose three coordinating seed beads. Cut off 30 inches of jewellery making wire using wire cutters.
Assembly:
- Find centre of pre-cut wire and centre marker on the wire. Push the two ends of wire in opposite directions around the marker until it has been wrapped approximately three times, this forms the base of the ring.
- Hold base firmly and remove ring from marker. Continue to hold firmly and slide the focal point bead on one of the wire ends until it sits horizontally against the marker.
- Place a seed bead on wire and continue to wrap the end of the wire clockwise around the bead. Put a slight bend in wire to keep seed bead in place. Continue wrapping wire clockwise around focal bead. Add another seed bead at approximately the 5 o'clock position. Again put a slight bend in wire to keep bead in place.
- Do a complete wrap around the focal bead going downward toward the bottom of the bead and then place the third and final seed bead at the 9 o'clock position.
- Now, grip end of wire with pliers and wrap around the base four times, cut away excess wire with wire cutters. Be sure to remove any sharp ends and wrap tightly.
- To finish, secure the second end of wire. Grip end of wire with pliers and wrap four times around the base on the opposite side of bead, cut away excess wire. Be sure to remove any sharp ends and wrap tightly.
Congratulations! You should now have a balanced looking cocktail ring resembling the one in the picture. Please note: any variations are encouraged as they add to the originality of your handcrafted cocktail ring!
By Lisa from Halifax, Nova Scotia
