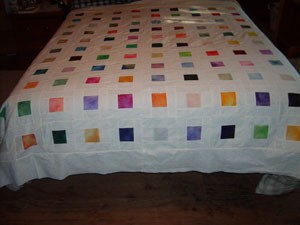
Turning your squares makes it so you do not have to match seams. Great for beginner quilters.
Update: Here is what I mean by "turning". When you make your squares, you turn one square opposite the other square so that one side goes horizontal and the other square the sides go vertical, and there is no need to match the seams.
I hope this helps.
By Leslie from Pittsfield, ME

Add your voice! Click below to comment. ThriftyFun is powered by your wisdom!
Forgive my ignorance but I do not understand what turning your squares means.
Please explain what turning your squares means. I have quilted but never heard that term. I see you've put white squares in between the colored ones to help disguise the imperfect intersections and create a white back ground..
I need an explanation of the term, also. Thanks! Your quilt is gorgeous.
Mary jammy_lmb AT msn.com
Very pretty quilt. Do tell us how you did it. Are they squares that are appliqued on a solid sheet?
I found this while googling "turning the squares" but it doesn't look like it applies to the pictured quilt.
justpurelovely.typepad.com/
I am also a quilter and have never come across "turning your squares". Please explain. Your quilt is lovely.
I would like to know how you turn your squares.....beautiful quilt. I am wanting to make one from pieces of clothing of my family that is deceased.
I have seen this twice, and I JUST don't get it-how are you TURNING them-which way-is the white part, part of a square? How are you attaching the colored part?
After reading all the comments, I am glad that I am not the only one who does not understand...
"Turning your squares makes it so you do not have to match seams. Great for beginner quilters."
Hi, I really don't understand what this means?
Add me to the list of "How to turn Squares in Quilting for idiots"!!!! I have no idea without step by step instructions.
Me, neither! Never heard of turning your squares when quilting. The quilt is lovely. Please explain to me, too. thanks
Is there some way ThriftyFun can contact leslie and find out how she did this?
Editor's Note: We have done that and there is now an update on this page from Leslie. Hope it is helpful.
What? Still don't understand. Can you please give more detail, and maybe you could do some step-by-step pictures. Thanks
Her directions don't make it clear to me; but looking at the photo, I now see what she is saying.
The blocks consist of one colored square, 2 white squares the same size, and 2 white rectangles that go across the top and bottom of the block, once the 3 smaller squares are joined.
I believe what Leslie means, is that the first block has the long rectangles in a horizontal orientation. The next block has them in the vertical orientation. By laying them this way, you don't have to worry about lining up the seams where the rectangles are sewn to the center piece (3 squares). You still have to line up the blocks, but you save yourself worrying about matching the inner seams.
Maybe that helps a bit?
OK, the picture is so small, I had to save it in my pictures & blow it up to see what you were talking about. When you make the squares, the long strips are at the top & bottom. So, the long strips are N & S and the short strips are E & W. When you join them, your first strip has N at the top, joining the E to the N of the next strip, then N is at the top again in the third, then E is at the top of the fourth strip.
Not to rain on Leslie's parade, but squares have four sides, and she talks about two sides. In addition, the "give" on fabric is different, depending on whether you are working with a piece cut across the grain or with the grain. When you turn squares (whatever that means) you risk having pieces that stretch differently, and lie differently, and even sew differently, and the end result may well be wavy surfaces, and funny looking quilt tops. blind_quilter AT yahoo.com
Add your voice! Click below to comment. ThriftyFun is powered by your wisdom!