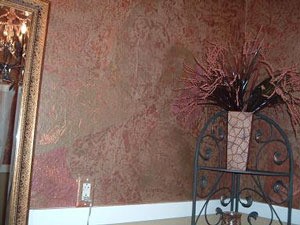
The walls in my bathroom were not in super good shape when I bought my 100 year old house, they had the old bumpy type plaster. After several attempts at painting, I finally came upon a solution.
I took both brown craft paper and red rosin paper (both available at home improvement stores) and tore it into uneven pieces, keeping some of them with a straight edge to put at the top of the wall where it met the ceiling. I then took them and crushed them between my hands really good and opened them up again, revealing the wrinkles. At this point smooth them slightly, but not very much.
Then, before I applied it to the wall, I spray painted some gold and used copper leaf paint on others (I bought the copper leaf paint at Wal-mart). I used a foam brush dipped in the copper leaf and very lightly drug it over the creases so it just hit the top of the creases. I let it dry and applied it with wallpaper paste. When it was all done, I applied a coat of water based polyurethane over the top.
I get more compliments on this room than any room in my house. I have a clawfoot tub and a vanity made from dresser. I also have chandeliers in there that adds to the glamor.
By Elaine from IA
Editor's Note: Here is Elaine's dresser vanity:

Add your voice! Click below to comment. ThriftyFun is powered by your wisdom!
Beautiful!!! I wish I could zoom in on this photo. I sure do like this look...very elegant!!!
This wall looks sooo beautiful !! Bet it is even more beautiful in person. The color looks so Rich . Thanks for including your instructions and How-To's.
You can also do this with tissue paper. Your room does look gorgeous, I have to admit. How long did it take you to do this? Darlene

I am so impressed. You did a beautiful job.
Thank you all.........I too, had seen the brown paper method done on floors so of course my ideas was born from that.
Red rosin paper is a paper that is a little heavier weight than brown paper and you can buy it at any home improvement store. It is used mainly to put down to cover flooring to keep it from getting soiled. I used this sparingly, just to add some more dimension.
Forgot to answer you Darlene. I had it done in a day except for the coat of polyurethane. Did that the next day to make sure everything was dry.
Elaine,
I truly enjoy all your posts! We seem to have alot in common - including the fact that we both live in Iowa. I live in Bettendorf. It would be great if we could get together with others who live in Iowa so we could share our thrifty and creative ideas.
I've researched this technique elsewhere on the web and they stated specific products had to be used. Did you use a specific wallpaper paste or will any standard brand available at the home center do? Sure wish I could see a larger pic.
I textured a kitchen wall in an old house that had layers and layers of ripped wallpaper to remove with a similar technique using crumpled tissue paper. But this is just a whole glamorous level beyond that. Well done!!! What a beautiful way to turn a problem into a feature.
You sure did an incredible job. You're very artistically talented.
The wall is so elegant.
How big were the pieces you tore?
Add your voice! Click below to comment. ThriftyFun is powered by your wisdom!