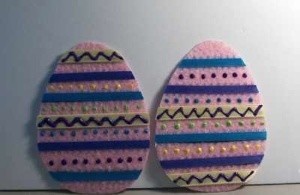
With some firm felt, paint, and ribbon, you can make multiple egg decorations all at the same time.

Approximate Time: 1 hour
Supplies:
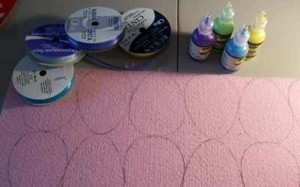
- stiff felt in either pink, yellow, etc.
- Scribbles paint in pastel colors, but not the same as the felt
- pastel ribbon
- tacky glue
- scissors
- Options: small pastel buttons, hole punch, and pin backs
Instructions:
- With the felt flat on the table, use an egg shape to trace them in a row.

- IMPORTANT: Do the top of the egg for the first, then the bottom on the top, and mix and match them like that for the length of the row.
What this does is makes every other egg the same and they don't all look alike.
- DO NOT MAKE MY MISTAKE. I used felt markers to draw the lines, and it came through some of the yellow ribbon. If you are good with lines, you really don't even need them. If not, measure down the side of the felt and just go from one mark on the left to the same mark on the right.

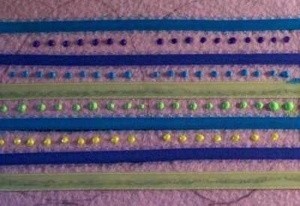
- Put some tacky glue on the lines, and put the ribbon down. Do all the ribbons at the same time. I used the tacky glue bottle like a rolling pin and that helped to get the ribbon down onto the felt.
- When the ribbons are done, I turned the felt upside down and laid some books on it for about 15 minutes.
- When the ribbon is set, get a good handle on the proper pressure on the glue. That is why I suggested buttons, as the paint can be tricky. If you are good at it, just make the dots across the open spaces between the ribbon.
- They require about 30 minutes to dry. You can make a sample dot next to the egg shape so you can test that one.
- You can do some fancy paint or button work on the ribbons, too. You can see that I did this on the yellow because the felt pen came through, even with two layers of yellow. Live and learn.
- When all is dried, cut the shapes out and either use them like a hanger and use a hole punch to loop ribbon and hang from windows, or other high places. You can make them smaller and put pin backs on them, as well.
N-JOY!
Add your voice! Click below to comment. ThriftyFun is powered by your wisdom!

christi
Bronze Recipe Medal for All Time! 52 Recipes March 25, 20100 found this helpful
Top Comment
Well I think you just did a fabulous job with these, even with the yellow ribbon, you made it okay by putting a design on it. These are so adorable. Thumbs up from me!
Add your voice! Click below to comment. ThriftyFun is powered by your wisdom!


