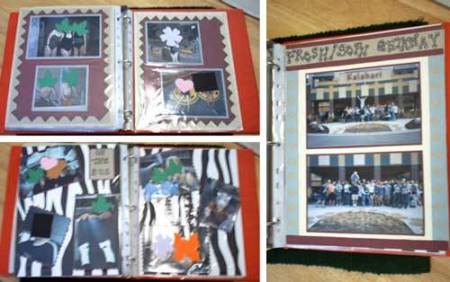
These pages were based on a trip we took to a resort called the Kalahari. Everything there had a Safari theme, so I made sure the scrapbook pages reflected that. The key to any good scrapbook page is layering. If you layer papers with different designs, you get a more dramatic effect. The faces have been covered to protect the identity of those persons involved.
Materials:
- archival quality scrapbook paper in natural colors
- scissors
- scrapbook double sided tape
- cross hole punch
- silver gel pen
- black marker
- scrapbook design scissors (these scissors will give your edges special designs)
- pencil
Directions:
- Start with a base paper. For the front page where I introduced the summer trip, I used a base paper of a gray color. I cut 1-1/2 inch off each side of cream paper and taped it to the center of the page. Double sided tape makes this easier, and you only have to place the tape on the back of the four corners.
- Then I cut 1-1/2 inch strips of light blue paper and used the cross paper punch to create the design on the long side of each strip.
- I then taped the strips to the long side of the paper. For the top strip and the bottom strip, I cut a 2 inch strip and a 1/2 inch strip along the short side of maroon paper. I taped the 1/2 inch strip at the bottom of the page and the 2 inch strip to the top of the page.
- Then I cut a 1-1/2 inch strip of grey paper to place as the banner at the top of the page. On it I wrote the title in bubble letters using a black marker, highlighting it with the silver gel pen.
- With the pictures, I taped them to the paper and then cut an even border around them. Then I taped those to the page.
- For the zebra pattern, it is much easier to cut a layer, because the stripes don't need to be so precise. I used white as the base, and cut various strips into long, curvy triangles. Cut from the 8-1/2 inch edge of the black paper upward, as you will be able to place the straight edge along the straight edge of the white paper more evenly. Just space out the stripes to give it a zebra-like pattern.
- For the pictures, again just tape them to the maroon paper, and use a scrapbook design scissor to cut out a border around the picture. Then tape those onto the page. I like to place my pictures at different angles to entertain the eye. I also labeled the page with the same lettering as the first page, but on a small square of paper.
- The last page of the trip maintained the style. I used a cream base and cut out a smaller rectangle of tan paper, which I taped to the center of the page. I then drew think lines the the magic marker along the outer border to add texture. Then I cut an even smaller triangle with a designed scrapbook scissor and taped that to the center.
- For the pictures, I used the same layering process as before, except I used the light blue paper and a straight border. Then I taped them to the page as they would fit.
Use your own creativity to decide how to design your page, but remember, layering gives your pages an extra touch and texture.
