social

Decorative Note Cards


Bronze Post Medal for All Time! 146 Posts

Homemade note cards that are hand-decorated in addition to using your printer for a few basics, and make the envelopes to match. Wrap in packets of 8 or 10 and give them to teachers, friends, and co-workers.

Advertisement

Approximate Time: 2-3 hours depending on how much you want to put into them.

Supplies:

  • 8 1/2 x 11 inch sheets of paper, mix and match the colors
  • Elmer's glue
  • a few sheets of multi-colored card stock
  • ribbon or other decorative items of choice, such as tiny silk flowers or beads
  • plain and decorative scissors
  • paper punches of choice
  • fine-tip Sharpie pen

Instructions:

  1. Gather up materials and supplies that you have available. I usually have one or two of the discontinued wallpaper books (real paper, not vinyl) and you can cut bits and pieces of pretty flowers or shapes that interest you to add touches of color and decorations to your notes.

  2. Decide what choices you have and how they can be used.

  3. Make the note-card first. You can begin with some clip-art from the internet or draw something yourself after folding the paper and trimming away 1/4 inch from sides and bottom of folded note. The folds will stay intact at the tops and left sides of our notes and "plus sheets".
    Advertisement

    You can take apart tiny silk flowers, using only the parts that appeal to your sense of design. Add to the notes by punching out small shapes from card stock or other paper, and gluing them in place.

    I like to make the punched shapes using the card stock, and layering them like petals on a flower. It adds interest and dimension. Leaves can be cut out just using the scissors "freehand" and maybe adding tiny touches of "veining" with the fine-tipped Sharpie. Be sure your note ends up a bit smaller than your envelope and the "plus" sheet of paper.
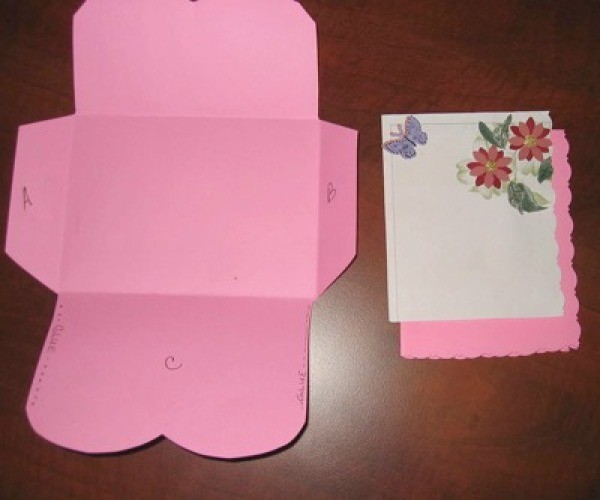
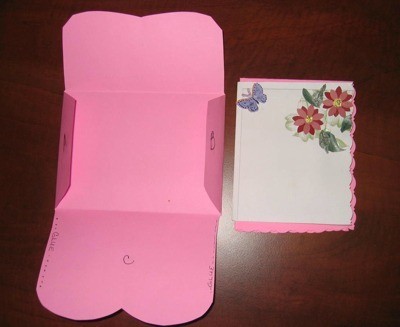
  4. Fold your "plus" sheet and cut a tiny bit from sides and bottom with decorative scissors. The "Plus Sheet" is for people (like me) who intend to write just a note, but end up writing 2 whole pages. It's there for you and matches your "note card". You don't have to use it if you don't want to.Card and unfinished envelope.
     

    Advertisement

  5. Make your envelope. Lay your finished note card on the sheet of paper and fold it to fit. Be sure to leave enough room to fit the note and the "Plus Sheet" in the envelope. Cut and glue the sides to form it correctly. Remember to keep in mind all the rules about letter sizes that your post office has about mail. They don't like "square things". If you can see them, there are the letters "A", "B" and "C" printed on the pattern of the envelope. A and B are folded in first, then glue is added to either side of the bottom "C" which folds up to make the envelope. Allow them to dry overnight if possible, before using.Folding envelope.
     

  6. You can make all the notes just alike or make each one different. People enjoy having a little variety to choose from when they are ready to write. Besides that, handmade gifts are never supposed to look like they were machine-made.
    Advertisement

  7. Tie the note-cards (with the envelopes) together with a ribbon, and wrap them. Don't forget to add a bow and a tag "To my Friend with Love" or "To my Favorite Teacher with Love and Appreciation".

  8. Make a few for yourself while you're at it and write your friend or family member a note. He or she is thinking of you and would love to hear from you.

Enjoy your creative time. The things you make with your own hands are "Gifts of Love", or just RAKs (Random Acts of Kindness).

By Julia from Boca Raton, FL
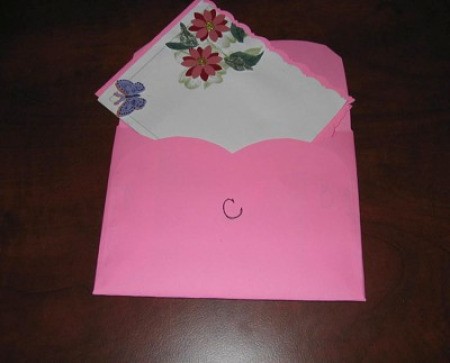
Finished card tucked inside envelope.
 

Add your voice! Click below to comment. ThriftyFun is powered by your wisdom!


Gold Feedback Medal for All Time! 690 Feedbacks
January 13, 20110 found this helpful
Top Comment

Julia, these are so pretty and a beautiful gift to give and receive. My TF friends in England make all kinds of cards and envelopes for us. It's wonderful getting a gift that someone took the time to make themselves.

Advertisement

Have you tried a glue stick instead of having to wait for Elmers glue to dry? Thanks for clear directions with photos.


Bronze Feedback Medal for All Time! 249 Feedbacks
January 19, 20110 found this helpful
Top Comment

What a clever and creative crafter you are Pookarina. These little
note cards are darling, and the way to make the matching envelopes is entirely different (and much easier) than I've seen before. I also like the way you've used the printer to lay a ground
work for the punched decorations.

Thank you so much for the great ideas

MisMachado


Bronze Feedback Medal for All Time! 145 Feedbacks
January 14, 20110 found this helpful

Julia, I agree with keeper60. These are as pretty as they can be, and the instructions perfectly clear. I really like the idea of running it through the printer and layering punched designs on it. Looks very professional. I also like the suggestion of a heart on the envelope. Thank you for a really nice craft idea.

Advertisement


Lee


Bronze Craft Medal for All Time! 63 Crafts
January 15, 20110 found this helpful

Love the design of note card and the edge detail. Very pretty! Well done!

 
January 19, 20110 found this helpful

Very pretty notecard!


Add your voice! Click below to comment. ThriftyFun is powered by your wisdom!

 
In This Page
Categories
Crafts Paper CardsJanuary 13, 2011
Pages
More
🎂
Birthday Ideas!
🍀
St. Patrick's Ideas!
Facebook
Pinterest
YouTube
Instagram
Categories
Better LivingBudget & FinanceBusiness and LegalComputersConsumer AdviceCoronavirusCraftsEducationEntertainmentFood and RecipesHealth & BeautyHolidays and PartiesHome and GardenMake Your OwnOrganizingParentingPetsPhotosTravel and RecreationWeddings
Published by ThriftyFun.
Desktop Page | View Mobile
Disclaimer | Privacy Policy | Contact Us
Generated 2024-02-15 04:21:22 in 3 secs. ⛅️️
© 1997-2024 by Cumuli, Inc. All Rights Reserved.
https://www.thriftyfun.com/tf67520955.tip.html