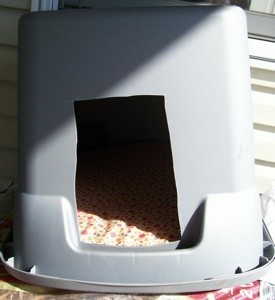
Having several cats that needed a place to sleep that was their own, I adapted a Sterilite storage container into a little shelter for them. Please note that these have to be in a protected area that does not get rained upon or wet or harsh weather. They are not waterproof. Water will collect and get into them if not stored in a roofed or dry area. We currently keep ours in our storage room that is in our carport.
The door to the carport has a square opening cut out, so that the cats can come and go from the sheltered area as they please. We have ours sitting upon brick landscaping squares to keep them off the floor and protect them even more from moisture. They do have small plastic grooves in the bottom, so we are sure to insert cedar chips, foam bedding, towels or fleece to keep them comfortable.
All you do is cut an opening into the front of the Sterilite container. This is the hardest part. Caution: Be VERY CAREFUL! It is really easy to cut yourself when trying to cut an opening in plastic this dense. The plastic is very hard and difficult to cut. I used a box cutter and a flat screwdriver to create the opening. If you know someone handy with tools, they may have an easier way to create the opening.
After creating your opening, reattach the top, flip the container over (top on the bottom), and you have a cheap little shelter. I don't think are substantial enough for a shelter in and of themselves, but they do help. Then we insert some bedding, and our pets have a nice place to lay.
While the one I have pictured looks very crude. It is functional. In fact, this winter, we purchased the warming mats that warm when laid upon by the pet. We put them into the plastic containers with nothing else in them, and snaked the cord out the back. They worked fine.
I have found the storage containers for five dollars or less. I make sure that I get a good sized one, where they can stand up comfortably, but small enough to conserve some of their body heat. I also take duct tape in the winter, and duct tape a piece of thick fabric or fleece, etc. to the front with a slit cut in it to block some of the cold air.
By Chris from USA

Add your voice! Click below to comment. ThriftyFun is powered by your wisdom!
Bless your heart! This is a really good idea!
That is the exact container I use as litter boxes. My husband cuts a "U" shaped hole from the top on one short end with a saws-all.
If you turned them over with the lid as the top (easier to clean!), they would be more water proof, and you could use duct tape and duct tape a piece of clear plastic tarp, etc. to the front about half way down the door opening, they would offer more protection against windblown water. Our cats have a few of these on our back porch and they've never gotten rain in them and they seem to love them.
I think it is a good idea/solution that works either way.
I made the opening using a sharp knife I heated up on the gas stove. It cuts right through. You have to keep reheating it and it's much easier than any other way I have tried.
I've heard of this before, but they used two of those boxes, one larger than the other. They took the larger one and put insulation into it (along the sides), then sit the littler one inside of it.
Thank you all for your great suggestions! I hadn't thought about flipping it the other way or using a hot knife to cut through the plastic. Also, the suggestion about using two with insulation sounds good, as it would keep them warmer. I'll have to print this page out, so I can use it as a reference next time I have to make one of these. I have a friend that has cats, and she also uses them to make litter boxes like you mentioned. They work well for her.
Add your voice! Click below to comment. ThriftyFun is powered by your wisdom!