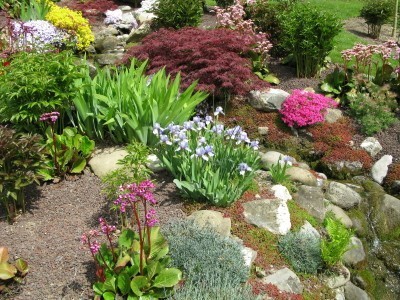
When rock gardens fail, it's usually due to poor planning. Although it sounds like a contradiction, some basic rules and principles need to be applied when trying to construct and recreate the randomness and beauty of Mother Nature.
Rock gardening is both rewarding and challenging. On the one hand, you can experiment with lots of different kinds of plants. On the other hand, all those different plants may have different needs, which can quickly become overwhelming. Construct a small rockery to start with. You can always expand it a little at a time if you find it is something you enjoy.
Most rock garden plants thrive in sunshine to partial shade and quick-draining soil. A slope protected from strong winds is ideal, but a flat site will work fine as long as there is enough drainage. With the right planning, plants can also be grown along the edges of retaining walls, paths, and patios.
Gardeners with limited space can use containers, pots, or troughs to house rocks plants. Artificial stone mixtures come in a variety of colors and can be applied to the outside of containers to create a more natural look.
Good drainage is essential for a rock garden, since most rock plants will not survive damp conditions. This is particularly important if the site is flat. Sometimes it's easier to build up for good drainage by mounding new soil on top of the ground, than by digging up existing soil. This can be done by using a mix of equal parts compost, builder's sand, and pea gravel.
One of the most common reasons that rock gardens fail is that gardeners fail to grow the right types of plants. In their native habitats, most "rock" species tolerate short growing seasons in thin, stony terrain with constant exposure to drying winds.
For alpine plants, this is followed by a fairly long winter spent under a layer of thick, insulating snow. Rarely do these plants encounter the prolonged growing seasons, extreme heat, and high humidity that they have to endure while growing in our backyards. This can make selecting the plants a bit tricky.
Upright: Usually placed against the base of a rock. An example would be dwarf conifers.
Prostrate: These are the cascading plants that spill over and sprawl in between rocks.
Large Specimens: Used in open spaces or planted at angles in between rocks.
Rosette forming Plants: Often tucked into crevices. An example would be hen and chicks.
Most rock garden plants are perennials. Because many rock garden plants tend to bloom in early spring, some gardeners also mix in heat-loving annuals and bulbs for year round color.
Good places to start looking for plants are local nurseries - especially those specializing in native plants. Rock gardening has become increasingly popular and many nurseries and garden centers are responding by offering a variety of interesting plants.
Getting plants from reputable local nurseries means they'll be well suited to your growing zone and they will probably also be much larger than those acquired from a catalog. To round out your collection, look for plants that form compact mounds, carpets or mats, and plants that spread by runners.
Part of the appeal of alpine plants is their small, compact size. Plants that spread farther than you would like can usually be controlled by cutting back, but it's best to limit fertilizer applications to once per year to prevent plants from growing too large.
Once plants get established, they are likely to need less frequent watering than other plants in your garden. Even so, get to know your plants and what their different moisture requirements are.
Too much moisture may cause root rot in some plants, while too little water may cause severe stress to others. In general, deep, infrequent watering is better than frequent light watering.
Mulching with a layer of small pebbles will conserve moisture, discourage slugs, and blend in nicely with the surrounding landscape. If you're growing plants with a lot of different moisture needs, it may be better to spot water individual plants.
To create a natural looking garden, look to nature for clues. On slopes, create tiers of L-shaped or U-shaped outcroppings using rocks that are commonly found in your part of the world. Use different sizes of the same types of stones throughout your garden to create a natural, but unified look.
Place larger stones at the base and smaller stones toward the top. Avoid creating patterns. Instead, strive for randomness. You will achieve a more natural look by grouping rocks in uneven clusters along with leaving a few spaces open for plants and randomly placed stones.
Rocks will look more natural if at least 1/3 of the rock's height is partially buried in the soil. Place the broadest side down in the soil and slant all of the rocks at a similar angle so that the tips point slightly up to direct water back toward the plants. This will help conserve water and help prevent erosion.

About The Author: Ellen Brown is an environmental writer and photographer and the owner of Sustainable Media, an environmental media company that specializes in helping businesses and organizations promote eco-friendly products and services. Contact her on the web at http://www.sustainable-media.com
Add your voice! Click below to comment. ThriftyFun is powered by your wisdom!
Add your voice! Click below to comment. ThriftyFun is powered by your wisdom!