social

Water Bracelet


Bronze Post Medal for All Time! 104 Posts

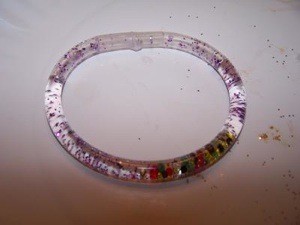
Clear plastic tubes filled with water, beads, and glitter to add sparkle. Move it back and forth and see them move.

Approximate Time: 1/2 hour

Advertisement

Supplies:

  • clear tubing, 2 sizes
  • tooth pick
  • seed beads
  • glitter
  • water
  • Krazy glue

Instructions:

You need 2 sizes of tubing. The smaller one fits inside the larger one (which you use for the bracelet) in order to seal the water from coming out. Or you could use a small wood dowel to block the water from coming out. The clear tubing looks better.

  1. Cut the larger sized tubing to fit the size of the child's wrist and big enough to fit over the hand. It will be glued together and not able to come apart.
  2. Cut a piece of the smaller tubing about an inch long.
  3. Put Krazy glue around the outside of the smaller tubing and push it 1/2 way into the larger tubing on one end.
  4. Put the seed beads into the tube. You may want to use a toothpick. They must be small in order to move freely.
  5. Now put a small amount of glitter. Maybe a pinch. Use several colors if you wish.

    Advertisement

  6. Place your finger over one end and fill with water leaving about an inch on each end. In order words, do not fill completely full.
  7. Now put Krazy glue on the last 1/2 of the smaller tube and push all the way in the larger one until they meet.
  8. Stand it up and allow to dry.
  9. After it drys, shake it hard and watch the beads move back and forth.

By Little Suzy from Millbury, OH

finished bracelet
 

Add your voice! Click below to comment. ThriftyFun is powered by your wisdom!

 
September 18, 20090 found this helpful

This is so fun. I remember these from when I was 6... 20 years ago! They had sun tan lotion in them most of the times. Such small genious ideas like that is what I miss in todays market.

 
September 25, 20090 found this helpful

I agree with Becca25 - kids really need their minds stimulated and today's toys do not seem to do that for them. I am an English teacher who also does crafts with her students and they are so amazed by what can be made from recycled or upcycled rubbish!

Advertisement


Thank you for sharing this with us - I will surely teach my kids to make them.

 
September 25, 20090 found this helpful

Great idea thank you for sharing. My grand daughter will love doing this.


Add your voice! Click below to comment. ThriftyFun is powered by your wisdom!

 
In This Page
Categories
Crafts Crafts For KidsSeptember 18, 2009
Pages
More
🍀
St. Patrick's Ideas!
🎂
Birthday Ideas!
💘
Valentine's Ideas!
Facebook
Pinterest
YouTube
Instagram
Categories
Better LivingBudget & FinanceBusiness and LegalComputersConsumer AdviceCoronavirusCraftsEducationEntertainmentFood and RecipesHealth & BeautyHolidays and PartiesHome and GardenMake Your OwnOrganizingParentingPetsPhotosTravel and RecreationWeddings
Published by ThriftyFun.
Desktop Page | View Mobile
Disclaimer | Privacy Policy | Contact Us
Generated 2024-02-05 15:40:13 in 3 secs. ⛅️️
© 1997-2024 by Cumuli, Inc. All Rights Reserved.
https://www.thriftyfun.com/tf85041513.tip.html