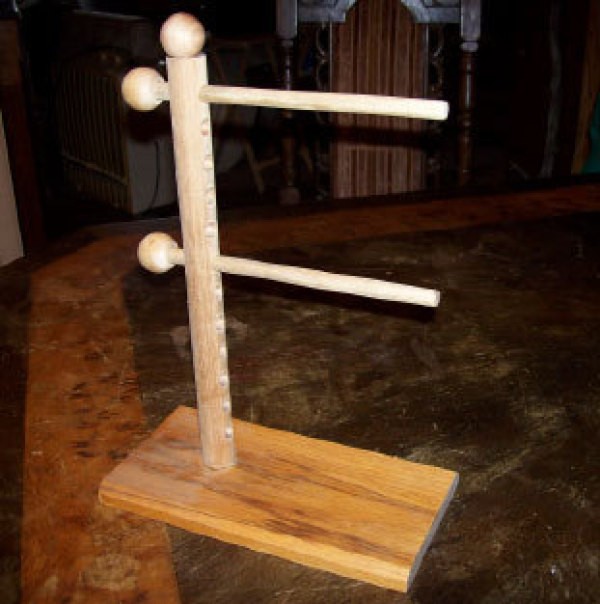
This would make a wonderful Mother's Day gift for the yarn artist in your family and this is a fun project for the home wood shop person in your home. With some cheap materials, you can have this made in a short time and begin to enjoy added tassels and pom poms to your handmade hats, scarves and afghans. This is also a good way to recycle those wooden dowels that flags that hang outdoors come on, if yours got hit by a wind storm.

Tower:
Pegs:
Base:
To use, decide on what size you want and wrap yarn around the pegs. For pom pom: Tie off with a piece of yarn tightly in center of wrapped yarn. Slide off pompom and tassel maker. Cut loops and fluff.
For tassel: Slide yarn through loops on top peg and tie. Do a tassel tie at top of loops and then slide off of the pompom and tassel maker. Cut loops on the bottom and your tassel is done. Many different sizes can be made just by adjusting the pegs. Have fun!
Here are the questions asked by community members. Read on to see the answers provided by the ThriftyFun community.
Does anyone have an old time Pom Pom maker, approx. 7 in. x 2 in.? It is made of wood, with 2 small dowels at either end. Between the dowels are sections of wood. Short pieces of yarn are inserted between the sections, long yarn wraps around dowels, then you pull yarn piece over to tie. When tied, a sharp knife cuts through the yarn between the same sections, creating the Pom Pom. I have used most of the new Pom makers and am not satisfied with any. This item would be circa 1950-1960's. If we can see a pic my husband can recreate. Thanks!
By Ann from Gainesville, FL

Have you possibly tried looking for one on ebay? You might be able to find one in a photo and enlarge it enough for your hubby to make you one. Hope this helps. Good luck!
southeastgeorgiapeac - Thank you for your response. I had tried eBay and other online aucitons and websites.
Dianamite - That's it! I can't thank you enough for helping me with this. I've honestly searched everywhere I could think of. I've watched my mother (now 82) and grandmother (passed) make so many beautiful rugs on that type. I even remember the rug backs, the outline was printed and tiny circles were where each pom went.
Thank you so very much, I can't explain what this means to me. :)
How do you make a tassel?
By joyce dinan from Australia
Take a piece of cardboard the size you want the tassel. Wrap the yard around the cardboard as many times as you want, if you want a really full tassel wrap it many times, if you want a thin tassel wrap it less times. Before removing from the cardboard, slip a piece of yarn under the wrapped yarn and tie a knot at the top, you may want to double tie it for securing reasons.
There are how to videos if you are more of a visual learner:
www.youtube.com/
You can make any size you wish and the more times you wrap it around the cardboard the plumper it will be.
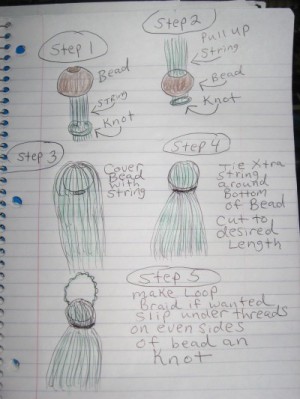
Get a wooden bead with a hole in it. Depending on the size of the tassel you will see in the bead, that will be the head of the tassel. Say you want a large tassel. Get one with a 1/2 inch hole, the bead 1 - 1 1/2 inches tall (Do not cut lengths until you see your tassle tied then you will know how long you want it). For a nice expensive looking tassel use embroidery threads or another fine looking string. You can even use satin ribbons. Cool yarns are also available now.
Grab a handful of your colors you want and tie a knot at the bottom with the loose ends put a piece of scotch tape tight around the end so you can slide the threads easily through the bead hole filling it around the inside and pull through until knot hits the hole make sure it is very full inside so that when you pull them out you come back down with the string and cover your bead all around.
Once your strings have covered the outside of your bead pull together at bottom and tie with 2-3 extra strands as close to the bottom as you can get and very tightly then knot. ( You can again also use satin ribbons or any tie of your choice) then cut the length you want your tassle to be. Lastly put 3-4 strands together, or ribbon to a length depending on how long you want your loop, more strands if you want your loop thicker and you can even braid them then evenly on each side stuff them under strings that are over the bead at the top and tie small knots. With satin ribbon loops you can either use hot glue to attach or sewn on. Whala tassels, and you can make some very expensive looking ones too. Good luck, Deby Sorry, haven't made it to my art class yet, I tried.

Use two pieces of cardboard, and place a piece of yarn crosswise between the two pieces with the ends hanging out. Then wrap the yarn around the cardboards in the vertical direction. This will allow you to put the tassel together before you take it off the cardboard. You can pull the crosswise yarn up and tie it around the yarn at one end of the two cardboards, and then slip your shears between the cardboards at the other end and cut the yarn.
After the tassel is off the cardboards, come down from the knotted yarn 1/4 to 1 inch, depending on size of tassel, and wrap a piece of yarn around tassel and tie tightly. This puts that little ball effect at the top of the tassel and helps hold the strings of the tassel from coming loose.
When you tie the knots, if you wrap the yarn over an extra wrap on the first part of the knot, when you pull it tight, it should hold so you can tie the knot tighter.
I have the old fashioned pom pom maker and I don't remember how to use it. Can you help with directions?
By Edith
If it is the type that looks like 2 half circles then. You place a piece of string along the insode of the half circles. MAke sure that it is long enough to stick both ends.
Check out these photos.
Glue two jumbo popsicle sticks onto a CD, then wrap your wool around the two sticks. When done, tie it in the middle then cut the sides. It's an easier way to make pom poms.